NG-ZORRO中Upload上传控件的实际运用
想要了解更多请看这里 - >
本文注重实现,并补充说明所用知识点~
背景:获取图片并在列表中显示缩略图且可预览图片,可向列表中添加新的图片或删除图片。
先上代码:
.ts
import { Component, OnInit } from '@angular/core';
import { UploadFile } from 'ng-zorro-antd';
import { Obj } from './obj';@Component({selector: 'app-test',templateUrl: './test.component.html',styleUrls: ['./test.component.less'],
})
export class TestComponent implements OnInit {public addObj: Obj = new Obj();imageList: Array = []; // 图片数组imageList_copy: Array = []; //图片数组showUploadList = {showPreviewIcon: true,showRemoveIcon: true,hidePreviewIconInNonImage: true};previewImage: string | undefined = '';previewVisible = false;/***  获取详情* @param id id*/getInfo(id): void {this.service.getInfo(id).subscribe((res: Result) => {if (res.rlt == 0) {this.addObj = res.datas;this.imageList = this.addObj.contentList.filter(ele => { return ele.contentType == 0 });this.imageList.forEach(element => {element['url'] = element.filePath.replace('\\', '\/') + '\/' + element.storeName;});this.imageList_copy = Object.assign([], this.imageList); }});}handlePreview = (file: UploadFile) => {this.previewImage = file.url || file.thumbUrl;this.previewVisible = true;};//上传图片upLoadChange(event) {let file = event ? event.file : null;let datas = file && file.id ? file : file.response && file.response.rlt == 0 && file.response.datas;if (datas) {if (event.type == 'success') {this.imageList_copy.push(datas);console.log('after upload', this.imageList_copy);this.imageList_copy.forEach(ele => {if (this.addObj.contentList.indexOf(ele) == -1) {this.addObj.contentList.push(ele);}})} else if (event.type == 'removed') {this.deleteImageById(datas.id, this.imageList_copy);console.log('after removed', this.imageList_copy);}}}deleteImageById(id, arr) {let index = arr.findIndex(ele => ele.id == id);if (arr.length > 0 && index != -1) {arr.splice(index, 1);this.addObj.contentList = arr; //更新附件数组}}}
.html
上传
参数说明类型默认值
[]
必选参数, 上传的地址
[]
上传列表的内建样式,支持三种基本样式 text, 和 -card
‘text’ / ‘’ / ‘-card’
‘text’
[]
文件列表,双向绑定
[]
()
上传文件改变时的状态
cf23c995a30c1aa17d69635de6eadf75
< >
[]
是否展示 , 可设为一个对象,用于单独设定 和
/ { ?: , ?: }
true
[]
点击文件链接或预览图标时的回调;注意:务必使用 => 定义处理方法。
(file: ) => void
注意!注意!!
[] 是双向绑定!!!(一开始我就掉坑了 TT)
初始效果如图:
选择一张图片上传
有注意到用了.()拷贝方式吗?目的自己猜啦,这里不多说><
this.imageList_copy = Object.assign([], this.imageList);
重点说下ES6中增加的.()方法~
.方法用于对象的合并,将源对象( )的所有可枚举属性,复制到目标对象( )
Object.assign(target, source_1, ..., source_n)
它会修改对象,然后将它返回:先将对象的所有可枚举属性复制给,然后依次复制等的属性。
深拷贝和浅拷贝
涉及一下深拷贝和浅拷贝的概念。中存储对象都是存地址的,所以浅拷贝是都指向同一块内存区块,而深拷贝则是另外开辟了一块区域。如下实例:
// 浅拷贝
const a = {t: 1, p: 'gg'};
const b = a;
b.t = 3;
console.log(a); // {t: 3, p: 'gg'}
console.log(b); // {t: 3, p: 'gg'}//深拷贝
const c = {t: 1, p: 'gg'};
const d = deepCopy(c);
d.t = 3;
console.log(c); // {t: 1, p: 'gg'}
console.log(d); // {t: 3, p: 'gg'}
明显看出,浅拷贝在改变其中一个值时,会导致其他也一起改变,而深拷贝不会。
.()
现在用es6 中的.() 方法,举举例子:
// Cloning an object
let obj = { a: 1 };
let copy = Object.assign({}, obj);
console.log(copy); // { a: 1 }// Merging objects
let o1 = { a: 1 };
let o2 = { b: 2 };
let o3 = { c: 3 };let obj1 = Object.assign(o1, o2, o3);
console.log(obj1); // { a: 1, b: 2, c: 3 }
console.log(o1);  // { a: 1, b: 2, c: 3 }, target object itself is changed.
console.log(o2);  // { b: 2 }
console.log(o3);  // { c: 3 }
虽然既可以复制又可以混合对象,但需要注意的是它只merge根属性,下面的就不做处理了。 且看例子:
const defaultOpt = {title: {text: 'hello world',subtext: 'It\'s my world.'}
};const opt = Object.assign({}, defaultOpt, {title: {subtext: 'Yes, your world.'}
});console.log(opt);// 预期结果
{title: {text: 'hello world',subtext: 'Yes, your world.'}
}
// 实际结果
{title: {subtext: 'Yes, your world.'}
}
稍微处理一下:
const defaultOpt = {title: {text: 'hello world',subtext: 'It\'s my world.'}
};const opt = Object.assign({}, defaultOpt);
opt.title.subtext = 'Yes, your world.';console.log(opt);
// 结果正常
{title: {text: 'hello world',subtext: 'Yes, your world.'}
}
但是,很悲催的是:
const defaultOpt = {title: {text: 'hello world',subtext: 'It\'s my world.'}
};const opt1 = Object.assign({}, defaultOpt);
const opt2 = Object.assign({}, defaultOpt);
opt2.title.subtext = 'Yes, your world.';console.log('opt1:');
console.log(opt1);
console.log('opt2:');
console.log(opt2);// 结果
opt1:
{title: {text: 'hello world',subtext: 'Yes, your world.'}
}
opt2:
{title: {text: 'hello world',subtext: 'Yes, your world.'}
}
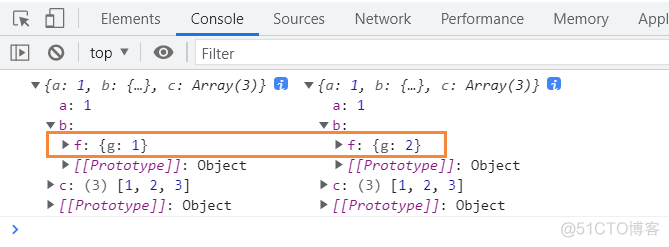
我们并没有去更改opt1 的 ,只是改了opt2 的。但结果两个配置变得一模一样
这说明一点:在title 这一层只是简单的浅拷贝 ,而没有继续深入的深拷贝。
总结
.() 只是一级属性复制,比浅拷贝多深拷贝了一层而已。实行的是浅拷贝,而不是深拷贝。也就是说,如果源对象某个属性的值是对象,那么目标对象拷贝得到的是这个对象的引用。用的时候,还是要注意这个问题的。
附
一个可以简单实现深拷贝的方法:const obj1 = JSON.parse(JSON.(obj));
先将一个对象转成json字符串,然后又将字符串转回对象。
const defaultObj = {title: {text: 'hello world',subtext: 'It\'s my world.'}
};const obj1 = JSON.parse(JSON.stringify(defaultObj));
const obj2 = JSON.parse(JSON.stringify(defaultObj));
obj2.title.subtext = 'Yes, your world.';console.log('obj1:');
console.log(obj1);
console.log('obj2:');
console.log(obj2);// 结果
obj1:
{title: {text: 'hello world',subtext: 'It\'s my world.'}
}
obj2:
{title: {text: 'hello world',subtext: 'Yes, your world.'}
}