【IMX6ULL驱动开发学习】09.Linux之I2C驱动框架简介和驱动程序模板
参考:Linux之I2C驱动 i2c驱动_风间琉璃•的博客-CSDN博客
目录
一、I2C驱动框架简介
1.1 I2C总线驱动
1.2I2C设备驱动
二、I2C总线-设备-驱动模型
2.
2.2
2.3I2C 设备数据收发和处理
三、Linux I2C驱动程序模板
一、I2C驱动框架简介
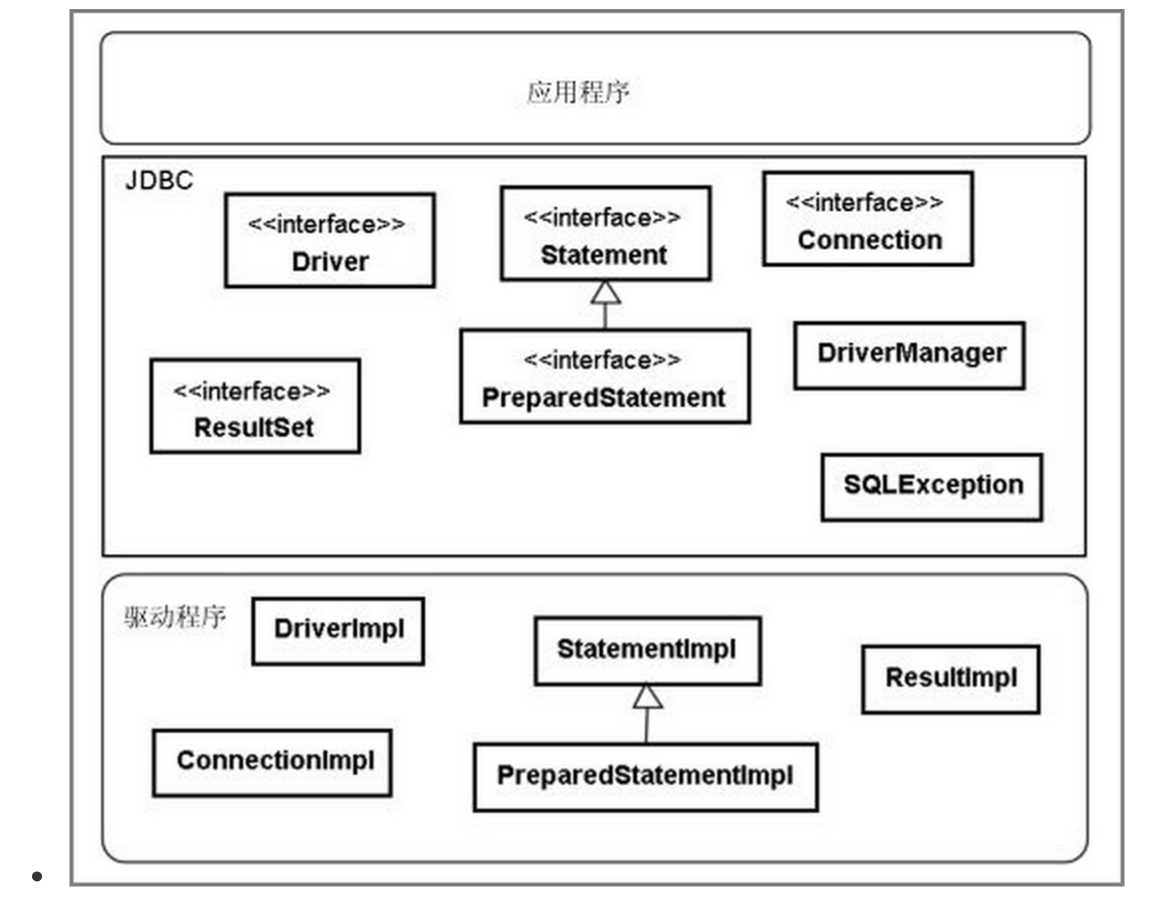
在 Linux 内核中 I2C 的体系结构分为 3 个部分:
1.1 I2C总线驱动
I2C 总线和 总线类似, 区别在于 总线是虚拟的一条总线, 而 I2C 总线是实际
存在的。 对于使用 I2C 通信的设备, 在驱动中直接使用 I2C 总结即可。 I2C 总线驱动的重点是 I2C 适配器驱动, 主要涉及到两个结构体: 和 。 在 Linux 内核中用 结构体来表示 I2C 适配器。 结构体定义在 /linux/i2c.h 文件中
struct i2c_adapter {struct module *owner;unsigned int class; /* classes to allow probing for */const struct i2c_algorithm *algo; /* 总线访问算法 */void *algo_data;/* data fields that are valid for all devices */struct rt_mutex bus_lock;int timeout; /* in jiffies */int retries;struct device dev; /* the adapter device */int nr;char name[48];struct completion dev_released;struct mutex userspace_clients_lock;struct list_head userspace_clients;struct i2c_bus_recovery_info *bus_recovery_info;const struct i2c_adapter_quirks *quirks;
};
类型的指针变量algo, 对于一个 I2C 适配器, 要对外提供读写 API 函数, 设备驱动程序可以使用这些 API 函数来完成读写操作。 是 I2C 适配器与 IIC 设备进行通信的方法。 结构体定义在 /linux/i2c.h 文件中
struct i2c_algorithm
{......int (*master_xfer)(struct i2c_adapter *adap,struct i2c_msg *msgs,int num);int (*smbus_xfer) (struct i2c_adapter *adap, u16 addr,unsigned short flags, char read_write,u8 command, int size, union i2c_smbus_data *data);/* To determine what the adapter supports */u32 (*functionality) (struct i2c_adapter *);......
};
一般 SOC 的 I2C 总线驱动都是由半导体厂商编写的,所以大多数只要专注于 I2C 设备驱动即可。
1.2I2C设备驱动
在 I2C 设备驱动中主要有两个重要的结构体: 和 。 是描述设备信息的, 描述驱动内容。
当驱动和设备匹配成功后,每检测到一个 I2C 设备就会给这个 I2C 设备分配一个,这个存储着这个设备的所有信息,如芯片地址。 结构体定义在/linux/i2c.h 文件中
struct i2c_client {unsigned short flags; /* 标志 */unsigned short addr; /* 芯片地址, 7 位,存在低 7 位*/......char name[I2C_NAME_SIZE]; /* 名字 */struct i2c_adapter *adapter; /* 对应的 I2C 适配器 */struct device dev; /* 设备结构体 */int irq; /* 中断 */struct list_head detected;......
};
类似 ,是编写 I2C 设备驱动重点要处理的内容, 结构体定义在 /linux/i2c.h 文件中
struct i2c_driver {unsigned int class;/* Notifies the driver that a new bus has appeared. You should* avoid using this, it will be removed in a near future.*/int (*attach_adapter)(struct i2c_adapter *) __deprecated;/* Standard driver model interfaces */int (*probe)(struct i2c_client *, const struct i2c_device_id *);int (*remove)(struct i2c_client *);/* driver model interfaces that don't relate to enumeration */void (*shutdown)(struct i2c_client *);/* Alert callback, for example for the SMBus alert protocol.* The format and meaning of the data value depends on the* protocol.For the SMBus alert protocol, there is a single bit* of data passed as the alert response's low bit ("eventflag"). */void (*alert)(struct i2c_client *, unsigned int data);/* a ioctl like command that can be used to perform specific* functions with the device.*/int (*command)(struct i2c_client *client, unsigned int cmd,void *arg);struct device_driver driver;const struct i2c_device_id *id_table;/* Device detection callback for automatic device creation */int (*detect)(struct i2c_client *, struct i2c_board_info *);const unsigned short *address_list;struct list_head clients;
};
当 I2C 设备和驱动匹配成功以后 probe 函数就会执行。 驱动结构体,如果使用设备树,需要设置 的 成员变量,即驱动的兼容()性。 未使用设备树的设备需要设置 设备匹配 ID 表。
构造结构体,里面会表明支持那些设备,入口函数里注册结构体,如果发现能够支持的的话,probe函数就被调用,在probe函数里记录信息、注册字符设备、注册、自动创建设备节点
I2C驱动程序与普通的字符设备驱动程序没有本质差别,唯一差别:发起数据传输时用到,该函数需要用到适配器(i2c控制器),probe函数被调用时内核会传入,里含有i2c控制器。
二、I2C总线-设备-驱动模型
2.
表明能支持哪些设备:
.name跟某个[i].值相同,则匹配成功
使用来判断
跟匹配成功后,就调用.probe函数。
/* 传统匹配方式 ID 列表 */
static const struct i2c_device_id xxx_id[] = {{"xxx", 0},{}
};/* 设备树匹配列表 */
static const struct of_device_id xxx_of_match[] = {{ .compatible = "xxx" },{ /* Sentinel */ }
};/* i2c 驱动结构体 */
static struct i2c_driver xxx_driver = {.probe = xxx_probe,.remove = xxx_remove,.driver = {.owner = THIS_MODULE,.name = "xxx",.of_match_table = xxx_of_match,  //使用设备树},.id_table = xxx_id,   //未使用设备树
};
2.2
表示一个I2C设备,创建的方法有4种:
(1)方法1:通过设备树来创建(常用)
i2c1: i2c@400a0000 {/* ... master properties skipped ... */clock-frequency = <100000>;flash@50 {compatible = "atmel,24c256";reg = <0x50>;};pca9532: gpio@60 {compatible = "nxp,pca9532";gpio-controller;#gpio-cells = <2>;reg = <0x60>;};};向 i2c1 添加 flash 子节点,flash@50是子节点名字, @后面的50是I2C 器件地址。 属性值为atmel,。reg属性也是设置I2C的器件地址的。I2C 设备节点的创建主要是 属性和 reg属性的设置,一个用于匹配驱动, 一个用于设置器件地址。
(2)方法2:
有时候无法知道该设备挂载哪个I2C bus下,无法知道它对应的I2C bus 。 但是可以通过其他方法知道对应的结构体。 可以使用下面两个函数来创建:
static struct i2c_board_info sfe4001_hwmon_info = {I2C_BOARD_INFO("max6647", 0x4e),};int sfe4001_init(struct efx_nic *efx){(...)efx->board_info.hwmon_client =i2c_new_device(&efx->i2c_adap, &sfe4001_hwmon_info);(...)}e
static const unsigned short normal_i2c[] = { 0x2c, 0x2d, I2C_CLIENT_END };static int usb_hcd_nxp_probe(struct platform_device *pdev){(...)struct i2c_adapter *i2c_adap;struct i2c_board_info i2c_info;(...)i2c_adap = i2c_get_adapter(2);memset(&i2c_info, 0, sizeof(struct i2c_board_info));strscpy(i2c_info.type, "isp1301_nxp", sizeof(i2c_info.type));isp1301_i2c_client = i2c_new_probed_device(i2c_adap, &i2c_info,normal_i2c, NULL);i2c_put_adapter(i2c_adap);(...)}差别:
(3)方法3(不推荐):由.函数来判断是否有对应的I2C设备并生成
(4)方法4:通过用户空间(user-space)生成 调试时、或者不方便通过代码明确地生成时,可以通过用户空间来生成。
// 创建一个i2c_client, .name = "eeprom", .addr=0x50, .adapter是i2c-3# echo eeprom 0x50 > /sys/bus/i2c/devices/i2c-3/new_device// 删除一个i2c_client# echo 0x50 > /sys/bus/i2c/devices/i2c-3/delete_device2.3I2C 设备数据收发和处理
在 I2C 设备驱动中首先要完成 结构体的创建、 初始化和注册, 当设备和驱动匹配成功后,就会执行 probe 函数, probe 函数中就是执行字符设备驱动的一套流程。
一般需要在probe函数里面初始化 I2C 设备,要初始化 I2C 设备需要使用 函数对 I2C 设备寄存器进行读写操作。 函数会调用 I2C 适配器中 里面的 函数, 对于 I.MX6U 而言是 这个函数。
int i2c_transfer(struct i2c_adapter *adap,struct i2c_msg *msgs,int num)adap: 所使用的 I2C 适配器, 会保存其对应的
msgs: I2C 要发送的一个或多个消息
num: 消息数量,msgs 的数量
返回值: 负值,失败,其他非负值,发送的 msgs 数量
msgs参数是一个 类型的指针参数,Linux内核使用 结构体描述一个消息。
struct i2c_msg {__u16 addr; /* 从机地址 */__u16 flags; /* 标志 */#define I2C_M_TEN 0x0010#define I2C_M_RD 0x0001#define I2C_M_STOP 0x8000#define I2C_M_NOSTART 0x4000#define I2C_M_REV_DIR_ADDR 0x2000#define I2C_M_IGNORE_NAK 0x1000#define I2C_M_NO_RD_ACK 0x0800#define I2C_M_RECV_LEN 0x0400__u16 len; /* 消息(本 msg)长度 */__u8 *buf; /* 消息数据 */
};
使用函数发送数据前,要构建好 ,使用 进行 I2C 数据收发的模板:
/* 设备结构体 */
struct xxx_dev {......void *private_data; /* 私有数据,一般会设置为 i2c_client */
};/*
* @description : 读取 I2C 设备多个寄存器数据
* @param – dev : I2C 设备
* @param – reg : 要读取的寄存器首地址
* @param – val : 读取到的数据
* @param – len : 要读取的数据长度
* @return : 操作结果
*/
static int xxx_read_regs(struct xxx_dev *dev, u8 reg, void *val,
int len)
{int ret;struct i2c_msg msg[2];struct i2c_client *client = (struct i2c_client *)dev->private_data;/* msg[0],第一条写消息,发送要读取的寄存器首地址 */msg[0].addr = client->addr; /* I2C 器件地址 */msg[0].flags = 0; /* 标记为发送数据 */msg[0].buf = ® /* 读取的首地址 */msg[0].len = 1; /* reg 长度 *//* msg[1],第二条读消息,读取寄存器数据 */msg[1].addr = client->addr; /* I2C 器件地址 */msg[1].flags = I2C_M_RD; /* 标记为读取数据 */msg[1].buf = val; /* 读取数据缓冲区 */msg[1].len = len; /* 要读取的数据长度 */ret = i2c_transfer(client->adapter, msg, 2);if(ret == 2) {ret = 0;} else {ret = -EREMOTEIO;}return ret;
}/*
* @description : 向 I2C 设备多个寄存器写入数据
* @param – dev : 要写入的设备结构体
* @param – reg : 要写入的寄存器首地址
* @param – buf : 要写入的数据缓冲区
* @param – len : 要写入的数据长度
* @return : 操作结果
*/
static s32 xxx_write_regs(struct xxx_dev *dev, u8 reg, u8 *buf,u8 len)
{u8 b[256];struct i2c_msg msg;struct i2c_client *client = (struct i2c_client *)dev->private_data;b[0] = reg; /* 寄存器首地址 */memcpy(&b[1],buf,len); /* 将要发送的数据拷贝到数组 b 里面 */msg.addr = client->addr; /* I2C 器件地址 */msg.flags = 0; /* 标记为写数据 */msg.buf = b; /* 要发送的数据缓冲区 */msg.len = len + 1; /* 要发送的数据长度 */return i2c_transfer(client->adapter, &msg, 1);
}
在设备结构体里面添加一个执行void的指针成员变量,此成员变量用于保存设备的私有数据,在 I2C 设备驱动中一般将其指向 I2C 设备对应的。
函数用于读取 I2C 设备多个寄存器数据,然后定义了一个 数组, 2 个数组元素。如图,I2C写时序图,因为 I2C 读取数据的时候要先发送要读取的寄存器地址,然后再读取数据,所以需要准备两个 。一个用于发送寄存器地址,一个用于读取寄存器值。
对于 msg[0], 将 flags设置为 0, 表示写数据。 msg[0]的 addr 是 I2C 设备的器件地址, msg[0]的 buf 成员变量就是要读取的寄存器地址。 对于 msg[1], 将 flags 设置为 , 表示读取数据。 msg[1]的 buf 成员变量用于保存读取到的数据, len 成员变量就是要读取的数据长度。 调用 函数完成 I2C 数据读操作。
函数用于向 I2C 设备多个寄存器写数据。 数组 b 用于存放寄存器首地址和要发送的数据,msg 的 addr设置为 I2C 器件地址。然后设置 msg 的 flags 为 0, 也就是写数据。设置要发送的数据, 也就是数组 b。设置 msg 的 len 为 len+1, 因为要加上一个字节的寄存器地址。 最后通过 函数完成向 I2C 设备的写操作。
另外还有两个API函数分别用于I2C数据的收发操作,这两个函数都会调用。
I2C 数据发送函数 :
int i2c_master_send(const struct i2c_client *client,const char *buf,int count): I2C 设备对应的
buf:要发送的数据
count: 要发送的数据字节数,要小于 64KB,以为 的 len 成员变量是一个 u16(无
符号 16 位)类型的数据。
返回值: 负值,失败,其他非负值,发送的字节数
I2C 数据接收函数为 :
int i2c_master_recv(const struct i2c_client *client,char *buf,int count): I2C 设备对应的
buf:要接收的数据
count: 要接收的数据字节数,要小于 64KB,以为 的 len 成员变量是一个 u16(无
符号 16 位)类型的数据
返回值: 负值,失败,其他非负值,发送的字节数
三、Linux I2C驱动程序模板
.c
#include "linux/i2c.h"
#include
#include #include
#include
#include
#include
#include
#include
#include
#include
#include
#include
#include
#include
#include
#include
#include
#include
#include
#include
#include
#include
#include
#include
#include /* 主设备号                                                                 */
static int major = 0;
static struct class *my_i2c_class;struct i2c_client *g_client;static DECLARE_WAIT_QUEUE_HEAD(gpio_wait);
struct fasync_struct *i2c_fasync;/* 实现对应的open/read/write等函数,填入file_operations结构体                   */
static ssize_t i2c_drv_read (struct file *file, char __user *buf, size_t size, loff_t *offset)
{int err;struct i2c_msg msgs[2];/* 初始化i2c_msg */err = i2c_transfer(g_client->adapter, msgs, 2);/* copy_to_user  */return 0;
}static ssize_t i2c_drv_write(struct file *file, const char __user *buf, size_t size, loff_t *offset)
{int err;/* copy_from_user  */struct i2c_msg msgs[2];/* 初始化i2c_msg */err = i2c_transfer(g_client->adapter, msgs, 2);return 0;
}static unsigned int i2c_drv_poll(struct file *fp, poll_table * wait)
{//printk("%s %s line %d\n", __FILE__, __FUNCTION__, __LINE__);poll_wait(fp, &gpio_wait, wait);//return is_key_buf_empty() ? 0 : POLLIN | POLLRDNORM;return 0;
}static int i2c_drv_fasync(int fd, struct file *file, int on)
{if (fasync_helper(fd, file, on, &i2c_fasync) >= 0)return 0;elsereturn -EIO;
}/* 定义自己的file_operations结构体                                              */
static struct file_operations i2c_drv_fops = {.owner	 = THIS_MODULE,.read    = i2c_drv_read,.write   = i2c_drv_write,.poll    = i2c_drv_poll,.fasync  = i2c_drv_fasync,
};static int i2c_drv_probe(struct i2c_client *client,const struct i2c_device_id *id)
{// struct device_node *np = client->dev.of_node;   从client获取设备节点// struct i2c_adapter *adapter = client->adapter;  从client获取控制器/* 记录client */g_client = client;/* 注册字符设备 *//* 注册file_operations 	*/major = register_chrdev(0, "100ask_i2c", &i2c_drv_fops);  /* /dev/gpio_desc */my_i2c_class = class_create(THIS_MODULE, "100ask_i2c_class");if (IS_ERR(my_i2c_class)) {printk("%s %s line %d\n", __FILE__, __FUNCTION__, __LINE__);unregister_chrdev(major, "100ask_i2c");return PTR_ERR(my_i2c_class);}device_create(my_i2c_class, NULL, MKDEV(major, 0), NULL, "myi2c"); /* /dev/myi2c */return 0;
}static int i2c_drv_remove(struct i2c_client *client)
{/* 反注册字符设备 */device_destroy(my_i2c_class, MKDEV(major, 0));class_destroy(my_i2c_class);unregister_chrdev(major, "100ask_i2c");return 0;
}static const struct of_device_id myi2c_dt_match[] = {{ .compatible = "100ask,i2cdev" },{},
};
static struct i2c_driver my_i2c_driver = {.driver = {.name = "100ask_i2c_drv",.owner = THIS_MODULE,.of_match_table = myi2c_dt_match,},.probe = i2c_drv_probe,.remove = i2c_drv_remove,
};static int __init i2c_drv_init(void)
{/* 注册i2c_driver */return i2c_add_driver(&my_i2c_driver);
}static void __exit i2c_drv_exit(void)
{/* 反注册i2c_driver */i2c_del_driver(&my_i2c_driver);
}/* 7. 其他完善:提供设备信息,自动创建设备节点                                     */module_init(i2c_drv_init);
module_exit(i2c_drv_exit);MODULE_LICENSE("GPL");