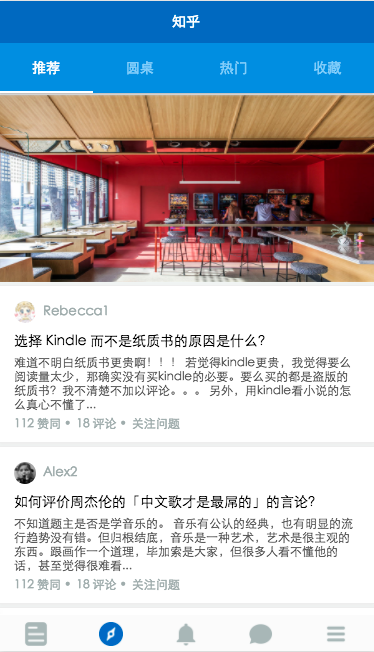
微信小程序Demo--仿知乎

类似于首页以及发现页这种标准列表式的数据展现方式, 微信提供了很好的方案---列表渲染
<block wx:for="{{feed}}" wx:for-index="idx" wx:for-item="item" data-idx="{{idx}}"><view class="feed-item"><view class="feed-source"><a class=""><view class="avatar"><image src="{{item.feed_source_img}}">image>view><text>{{item.feed_source_name}}{{item.feed_source_txt}}text>a><image class="item-more" mode="aspectFit" src="../../images/more.png">image>view><view class="feed-content"><view class="question" qid="{{question_id}}" bindtap="bindQueTap"><a class="question-link"><text>{{item.question}}text>a>view><view class="answer-body"><view bindtap="bindItemTap"><text class="answer-txt" aid="{{answer_id}}">{{item.answer_ctnt}}text>view><view class="answer-actions" bindtap="bindItemTap"><view class="like dot"><a>{{item.good_num}} 赞同 a>view><view class="comments dot"><a>{{item.comment_num}} 评论 a>view><view class="follow-it"><a>关注问题a>view>view>view>view>view>
block>
可以直观的看出, 就是 for 循环来用重复的结构渲染一组数据
同样也使用了 for 渲染的还有顶部的发现页和通知页等顶部的自定义
顶部 实现
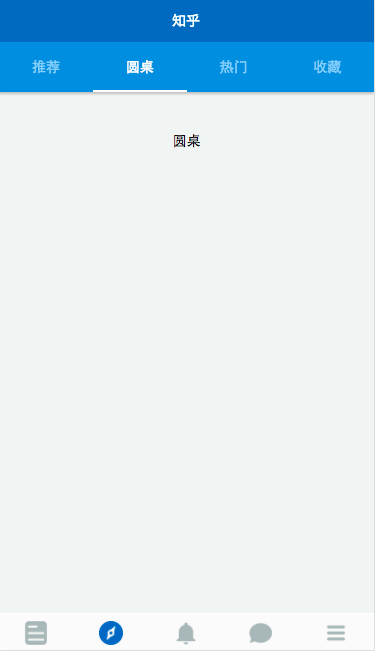

微信只提供了底部 , 所以顶部的要自己写喽~
顶部 的实现在于 for 列表渲染以及 js 配合
wxml:
<view class="top-tab flex-wrp flex-tab " ><view class="toptab flex-item {{currentNavtab==idx ? 'active' : ''}}" wx:for="{{navTab}}" wx:for-index="idx" wx:for-item="itemName" data-idx="{{idx}}" bindtap="switchTab">{{itemName}}view>
view>
<scroll-view scroll-y="true" class="container discovery withtab" bindscrolltoupper="upper" bindscrolltolower="lower"  scroll-into-view="{{toView}}" scroll-top="{{scrollTop}}"><view class="ctnt0" hidden="{{currentNavtab==0 ? '' : true}}">view><view class="ctnt1 placehold" hidden="{{currentNavtab==1 ? '' : true}}"><text>圆桌text>view><view class="ctnt2 placehold" hidden="{{currentNavtab==2 ? '' : true}}"><text>热门text>view><view class="ctnt3 placehold" hidden="{{currentNavtab==3 ? '' : true}}"><text>收藏text>view>
scroll-view>
js:
//discovery.js
Page({data: {navTab: ["推荐", "圆桌", "热门", "收藏"],currentNavtab: "0"},onLoad: function () {console.log('onLoad')},switchTab: function(e){this.setData({currentNavtab: e.currentTarget.dataset.idx});}
});
由于微信不支持任何 dom 和 对象, 所以 的实现依赖于微信提供的视图层的展示逻辑, 以及视图与数据之间的绑定机制.
绑定点击事件, 通过改变一个 data- 属性的值, 来控制元素的类的改变( 从而改变样式等 )
轮播图
<swiper class="activity" indicator-dots="{{indicatorDots}}"autoplay="{{autoplay}}" interval="{{interval}}" duration="{{duration}}"><block wx:for="{{imgUrls}}"><swiper-item><image src="{{item}}" class="slide-image" width="355" height="155"/>swiper-item>block>
swiper>
imgUrls: ['../../images/24213.jpg','../../images/24280.jpg','../../images/1444983318907-_DSC1826.jpg'
],
indicatorDots: false,
autoplay: true,
interval: 5000,
duration: 1000,
feed: [],
feed_length: 0
轮播图的实现使用的是微信提供的 组件, 该组件贴心的提供了各种属性选择, 常用的包括, 时间, 等
中包含的是所有轮播的图片, 为了方便修改图片数据, 同样采用 for 渲染绑定 data 的方式
下拉刷新, 上拉加载, 以及数据请求
刷新及继续加载的动作, 依靠的是标签, 及配套的upper 和 lower 事件
标签的属性提供了 和 来绑定滚动到顶部及底部所触发的事件, 同时upper- 和 lower- 能够调整触发时距边界的距离
除上述之外, 还提供横向滚动, 滚动触发事件, 及设置滚动条位置等...
{{item.feed_source_name}}{{item.feed_source_txt}} {{item.question}} { {item.answer_ctnt}} {{item.good_num}} 赞同 {{item.comment_num}} 评论 关注问题 滚动至顶或至底时, 触发的加载数据的事件, 本应该调用微信提供的网络请求 API 来获取数据. 但是比较坑的是, 我在选择写仿知乎 demo 的时候没有注意到知乎不提供开放 API, 而微信的 API 不支持直接对.json 文件进行本地请求, 无奈之下, 选择在 js 文件中伪造一段数据, .抛出, 来 fake 数据请求
upper: function () {wx.showNavigationBarLoading()this.refresh();console.log("upper");setTimeout(function(){wx.hideNavigationBarLoading();wx.stopPullDownRefresh();}, 2000);},lower: function (e) {wx.showNavigationBarLoading();var that = this;setTimeout(function(){wx.hideNavigationBarLoading();that.nextLoad();}, 1000);console.log("lower")},//scroll: function (e) {// console.log("scroll")//},//网络请求数据, 实现刷新refresh0: function(){var index_api = '';util.getData(index_api).then(function(data){//this.setData({////});console.log(data);});},//使用本地 fake 数据实现刷新效果refresh: function(){var feed = util.getDiscovery();console.log("loaddata");var feed_data = feed.data;this.setData({feed:feed_data,feed_length: feed_data.length});},//使用本地 fake 数据实现继续加载效果nextLoad: function(){var next = util.discoveryNext();console.log("continueload");var next_data = next.data;this.setData({feed: this.data.feed.concat(next_data),feed_length: this.data.feed_length + next_data.length});}
由于是 fake 的数据, 所以这个 demo 并没有做真实的带参跳转, 查询等功能
加载数据的同时, 使用微信提供的加载动画wx.ding();

其他
后续
其实还有大量的组件和 API 还没有用过, 这个 demo 也许后续还会有更新呦, 这取决于懒癌少女的病情严重程度了
项目地址
传送门: - /weapp--zhihu: 微信中的知乎--微信小程序 demo // Zhihu in
也许算是些感受?
其实作为一个小前端, 由于工作中的原因, 使用 MVVM 其实非常少的, 不过写了这个微信小程序 demo 之后, 更加把这方便的思维理顺了. 当然, 写完之后回头看, 还是有超多的不足, 明明好些地方能再换一种写法的. 不过毕竟是我第一次尝试用新鲜热乎的东西写小 demo, 也是第一次尝试写教程...或者算是记录? ~~