Centos7下的NS-3安装与配置总结(超详细!超完整!)
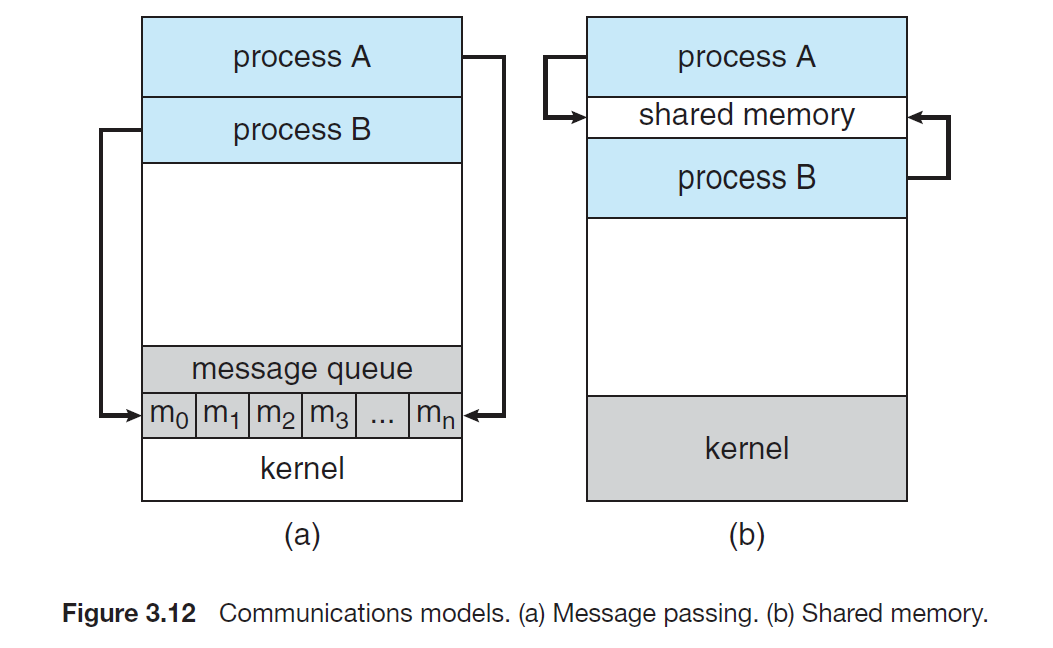
1 NS-3概述
官网:
ns-3is a -event for , for and use. ns-3 is free , under the GNU GPLv2 , and is for , , and use.ns-3是用于因特网系统的离散事件网络模拟器,主要用于研究和教育用途。ns-3是免费软件,根据GNU GPLv2许可证授权,可公开用于研究,开发和使用。
介绍完NS-3的用途接下来就是安装教程啦~
注意:本实验所有操作通过虚拟机直接进入root用户进行操作,默认所有操作都在root权限下进行。
2 平台安装 2.1安装ns-3的依赖环境
yum gcc-c++
yum -devel
yum
yum
yum - dia -latex
yum -devel
yum
yum -devel
yum -devel
yum boost-devel
yum -devel --devel
sudo
yum -devel
Then the RPM for -devel from here:
在上面网址下载-0.14.1-3.el6.nux..rpm和-devel-0.14.1-3.el6.nux..rpm,放入/root/文件夹中,用rpm进行安装时要在包前加上文件路径。
rpm -ivh /root//-0.14.1-3.el6.nux..rpm -- --force
rpm -ivh /root//-devel-0.14.1-3.el6.nux..rpm -- --force
yum git
yum gsl gsl-devel
yum gtk2 gtk2-devel
yum gdb
2. ns-3
创建文件夹:[root@ ~]#mkdir
进入:[root@ ~]# cd
联网下载:[root@ ]# wget ns--3.21.tar.bz2
解压:[root@ ]# tar jxvf ns--3.21.tar.bz2
进入ns--3.21:[root@ ]# cd ns--3.21
构建安装:[root@ ns--3.21]# ./build.py
进入ns-3.21:[root@ ns--3.21]# cd ns-3.21
使用waf编译安装,使用test.py测试,运行脚本测试:
[root@ ns-3.21]# ./test.py
[root@ ns-3.21]# ./waf
[root@ ns-3.21]# ./waf --build-=debug--- ---tests
[root@ ns-3.21]# ./waf
[root@ ns-3.21]# ./test.py -c core
[root@ ns-3.21]# ./waf --hello-
通过以上代码和部分压缩吧可以搭建好ns-3.21的环境,接下来是安装。
3 配置 3.1 安装
(1)测试一下是否已安装jdk:# java -
一般已经安装jdk 8.0,如果没安装,在root用户下,输入命令yum java
(2)下载:# wget
(3)新建一个文件夹保存下载压缩包:
# mkdir
# mv /root/-jee-luna-SR2-linux-gtk-.tar.gz /root/
(4)将压缩包解压到/opt目录下:
# cd
# tar -zxvf -jee-luna-SR2-linux-gtk-.tar.gz -C/opt
(5)建立软连接(等同于快捷方式):
# ln -s /opt// /usr/bin/
(6)为 设置桌面启动:
# vim /usr/share//.
并在文件中添加如下内容:
[Desktop Entry]
Encoding=UTF-8
Name=Eclipse 4.4.1
Comment=Eclipse Luna
Exec=/usr/bin/eclipse
con=/opt/eclipse/icon.xpm
Terminal=false
Version=1.0
Type=Application
Categories=Application;Development;Java;IDE:wq保存退出
(7)安装完成,可在应用程序——编程中查看
3.2 安装cdt
(1)打开 ,点击 help- new
点击Add
Nmae:cdt
:
点击ok后,再点击右下方next按照需要选择组件继续向下安装即可。
3.3 配置
(1)新建一个C++,我将其name命名为,这个项目的路径是:/root//
将/root//ns--3.21/ns-3.21目录下的所有文件,全部复制到目录中,在中刷新构建该项目。
(2)进入ns-3.21目录,执行waf配置:
# cd /root//ns--3.21/ns-3.21
# ./waf --build-=debug--- ---tests
(3)回到,右击项目,选择,点击C/C++ build
Build 栏中改写为:${://waf}
Build 栏中改写为:${://build}
点击上方的,将all改为build
点击apply,ok完成应用设置。
(4)右击项目,选择debug as --> debug --> 选择C/C++
修改C/C++ :build//-
再选,添加如下信息:
:
Value:${://build}
(5)运行文件夹下的,运行结果如下图所示:
至此,配置成功。
4 脚本运行 4.1 终端编译运行
(1)将编写的脚本(和)复制到/root//ns--3.21/ns-3.21/目录下,可以在窗口界面直接复制;然后,进入ns3目录:# cd /root//ns--3.21/ns-3.21
(2)构建(编译):# ./waf
(3)运行脚本
运行脚本:# ./waf --run /first
运行脚本:# ./waf --run /
4.2 编译运行
(1)将编写的脚本(和)复制到/root///目录下,刷新构建该工程。
(2)右击项目,选择debug as --> debug --> 选择C/C++
修改C/C++ :build//first
然后点击apply应用于该项目。
(3)打开文件,运行可的如下结果:
5 可视化界面
PyViz是一个用开发的在线ns-3可视化工具,不需要使用trace文件
5.1 PyViz安装
(1)首先需要检查机器上是否有epel仓库,因为会用到里面的一些包。如果有结果则从(2)开始向下进行,如果无显示则表明本机无epel仓库需要继续执行后续操作。
检查epel仓库:# rpm -qa | grep epel
安装epel:# yum -y epel-
查看仓库信息:# yum
(2)安装该模块依赖的软件包
# yum -devel gnome- gnome-- gnome--rsvg - -kiwi -devel
(红色字体的包我没有在yum,epel源中找到,暂时不知是否会对以后操作有影响,所以暂且搁置。做完回来发现这三个包即使没有找到未安装,最后的可视化界面也能出来,还是没有搞懂,我还是自己再研究研究吧。)
# yum
# yum
# yum mock
# -s /sbin/
# yum cmake glibc-devel glibc-devel
#
(3)下载pyviz
pyviz下载网址:
# tar -xzvf ns-3-pyviz-.tar.gz
解压后将文件夹放在/root//ns--3.21/ns-3.21/目录下,再重新编译如下命令:
# ./waf clean
# ./waf --build-=debug --- ---tests
(4)用如下命令可以测试是否安装成功:
# ./waf --pyrun src/flow-//wifi-olsr-.py --
若安装成功则会出现下图:
5.使用
(1)修改脚本
首先,到/root//ns--3.21/ns-3.21/找到和;
然后,双击打开这两个脚本,看文件中是否有以下两句,如果没有则添加到两文件的指定位置:
CommandLine cmd;
cmd.Parse(argc,argv);
(2)运行脚本显示可视化图像
#./waf --run /first --vis
#./waf --run / --vis
6 总结
拖拖拉拉好长时间终于将NS-3的总体框架搭建成功了~希望对大家的学习有所帮助,有问题可以评论,我会尽力帮大家解决哒~
That is all.
7 附录 7.1
/* -*- Mode:C++; c-file-style:"gnu"; indent-tabs-mode:nil; -*- */
/** This program is free software; you can redistribute it and/or modify* it under the terms of the GNU General Public License version 2 as* published by the Free Software Foundation;** This program is distributed in the hope that it will be useful,* but WITHOUT ANY WARRANTY; without even the implied warranty of* MERCHANTABILITY or FITNESS FOR A PARTICULAR PURPOSE.  See the* GNU General Public License for more details.** You should have received a copy of the GNU General Public License* along with this program; if not, write to the Free Software* Foundation, Inc., 59 Temple Place, Suite 330, Boston, MA  02111-1307  USA*///Include头文件
#include "ns3/core-module.h"
#include "ns3/network-module.h"
#include "ns3/internet-module.h"
#include "ns3/point-to-point-module.h"
#include "ns3/applications-module.h"//使用ns3 namespace(无需使用ns3::)
using namespace ns3;//定义一个log模块
NS_LOG_COMPONENT_DEFINE ("FirstScriptExample");int
main (int argc, char *argv[])
{CommandLine cmd;cmd.Parse(argc,argv);Time::SetResolution (Time::NS);//Enable两个log模块,将在收到和发出数据包后输出log消息LogComponentEnable ("UdpEchoClientApplication", LOG_LEVEL_INFO);LogComponentEnable ("UdpEchoServerApplication", LOG_LEVEL_INFO);//NodeContainer:便于我们创建、管理和访问Node对象NodeContainer nodes;nodes.Create (2);//帮助我们配置和连接PointToPointNetDevice和PointToPointChannel//将Device的数据发送速率设为5Mbps//将Channel的时延设为2msPointToPointHelper pointToPoint;pointToPoint.SetDeviceAttribute ("DataRate", StringValue ("5Mbps"));pointToPoint.SetChannelAttribute ("Delay", StringValue ("2ms"));//使用helper的Install方法在每个节点上创建一个pointToPointNetDevice,//保存在NetDeviceContainer中,并且还创建了一个PointToPointChannelNetDeviceContainer devices;devices = pointToPoint.Install (nodes);//在两个node上安装协议栈(IP、TCP、UDP等)InternetStackHelper stack;stack.Install (nodes);//管理和分配IPv4地址//在Device上依次绑定IP地址,10.1.1.1开始,直到10.1.1.254,产生网络接口(interface)Ipv4AddressHelper address;address.SetBase ("10.1.1.0", "255.255.255.0");Ipv4InterfaceContainer interfaces = address.Assign (devices);//UdpEchoServerApplication和UdpEchoClientApplication//创建一个工作在端口9的echoServerUdpEchoServerHelper echoServer (9);//使用Install方法将Application安装在#1的Node上//Application在第1秒开始运行,在第10秒停止ApplicationContainer serverApps = echoServer.Install (nodes.Get (1));serverApps.Start (Seconds (1.0));serverApps.Stop (Seconds (10.0));//指定对端的地址和端口、指定最大发包数、发包间隔、大小UdpEchoClientHelper echoClient (interfaces.GetAddress (1), 9);echoClient.SetAttribute ("MaxPackets", UintegerValue (1));echoClient.SetAttribute ("Interval", TimeValue (Seconds (1.0)));echoClient.SetAttribute ("PacketSize", UintegerValue (1024));//使用Install方法在节点0创建echoClient//第2秒开始、第10秒停止ApplicationContainer clientApps = echoClient.Install (nodes.Get (0));clientApps.Start (Seconds (2.0));clientApps.Stop (Seconds (10.0));//执行仿真//按照事件的时序,从第0到第10秒执行//使用Destroy清理,资源回收Simulator::Run ();Simulator::Destroy ();return 0;
}
7.2
/* -*- Mode:C++; c-file-style:"gnu"; indent-tabs-mode:nil; -*- */
/** This program is free software; you can redistribute it and/or modify* it under the terms of the GNU General Public License version 2 as* published by the Free Software Foundation;** This program is distributed in the hope that it will be useful,* but WITHOUT ANY WARRANTY; without even the implied warranty of* MERCHANTABILITY or FITNESS FOR A PARTICULAR PURPOSE.  See the* GNU General Public License for more details.** You should have received a copy of the GNU General Public License* along with this program; if not, write to the Free Software* Foundation, Inc., 59 Temple Place, Suite 330, Boston, MA  02111-1307  USA*/#include "ns3/core-module.h"
#include "ns3/network-module.h"
#include "ns3/csma-module.h"
#include "ns3/internet-module.h"
#include "ns3/point-to-point-module.h"
#include "ns3/applications-module.h"
#include "ns3/ipv4-global-routing-helper.h"// Default Network Topology
//
//       10.1.1.0
// n0 -------------- n1   n2   n3   n4
//    point-to-point  |    |    |    |
//                    ================
//                      LAN 10.1.2.0using namespace ns3;NS_LOG_COMPONENT_DEFINE ("SecondScriptExample");int
main (int argc, char *argv[])
{bool verbose = true;uint32_t nCsma = 3;//命令行参数,允许用户指定脚本运行时的参数CommandLine cmd;cmd.AddValue ("nCsma", "Number of \"extra\" CSMA nodes/devices", nCsma);cmd.AddValue ("verbose", "Tell echo applications to log if true", verbose);cmd.Parse (argc,argv);//根据用户命令行参数,启用Loggingif (verbose){LogComponentEnable ("UdpEchoClientApplication", LOG_LEVEL_INFO);LogComponentEnable ("UdpEchoServerApplication", LOG_LEVEL_INFO);}//个数为1或nCsmanCsma = nCsma == 0 ? 1 : nCsma;/**************开始定义网络拓扑***************///两个p2p节点:n0和n1NodeContainer p2pNodes;p2pNodes.Create (2);//nCsma个CSMA节点NodeContainer csmaNodes;csmaNodes.Add (p2pNodes.Get (1));csmaNodes.Create (nCsma);//P2P链路属性PointToPointHelper pointToPoint;pointToPoint.SetDeviceAttribute ("DataRate", StringValue ("5Mbps"));pointToPoint.SetChannelAttribute ("Delay", StringValue ("2ms"));NetDeviceContainer p2pDevices;p2pDevices = pointToPoint.Install (p2pNodes);//总线网络属性CsmaHelper csma;csma.SetChannelAttribute ("DataRate", StringValue ("100Mbps"));csma.SetChannelAttribute ("Delay", TimeValue (NanoSeconds (6560)));NetDeviceContainer csmaDevices;csmaDevices = csma.Install (csmaNodes);//安装协议栈InternetStackHelper stack;stack.Install (p2pNodes.Get (0));stack.Install (csmaNodes);//分配IP地址Ipv4AddressHelper address;address.SetBase ("10.1.1.0", "255.255.255.0");   //p2p网段Ipv4InterfaceContainer p2pInterfaces;p2pInterfaces = address.Assign (p2pDevices);address.SetBase ("10.1.2.0", "255.255.255.0");   //总线网段Ipv4InterfaceContainer csmaInterfaces;csmaInterfaces = address.Assign (csmaDevices);/**************网络拓扑定义结束***************//**************应用程序开始***************/UdpEchoServerHelper echoServer (9);//服务器在最后一个节点上ApplicationContainer serverApps = echoServer.Install (csmaNodes.Get (nCsma));serverApps.Start (Seconds (1.0));serverApps.Stop (Seconds (10.0));UdpEchoClientHelper echoClient (csmaInterfaces.GetAddress (nCsma), 9);echoClient.SetAttribute ("MaxPackets", UintegerValue (1));echoClient.SetAttribute ("Interval", TimeValue (Seconds (1.0)));echoClient.SetAttribute ("PacketSize", UintegerValue (1024));//客户端在n0ApplicationContainer clientApps = echoClient.Install (p2pNodes.Get (0));clientApps.Start (Seconds (2.0));clientApps.Stop (Seconds (10.0));/**************应用程序结束***************///根据节点产生的链路通告为每个节点建立路由信息Ipv4GlobalRoutingHelper::PopulateRoutingTables ();//开启pcap跟踪,生成以"second"为前缀的文件名pointToPoint.EnablePcapAll ("second");csma.EnablePcap ("second", csmaDevices.Get (1), true);Simulator::Run ();Simulator::Destroy ();return 0;
}
8 参考资料
ns-3手册:#
下安装配置NS3:
NS_3--PyViz: