spring boot快速了解(在ssm的基础上)
第一章:开发入门 1、优点
依靠大量注解实现自动化配置
无需打WAR包,自动打包部署到服务器
自动下载和拉去web相关JAR包
提供默认自动化配置类
指标和指控检查
java配置类替换XML配置方式
2、老规矩:Hello World java启动
1. jdk1.8
2. 1.5.2.
3. 开发工具( IDEA 2017.1.1)
4. 数据库管理工具( 11.1.7)
5. 文本管理工具( text 3)
6. maven(3.3.9,本章采用maven形式管理jar包,具体配置环境变量以及使用请自行查找资料)
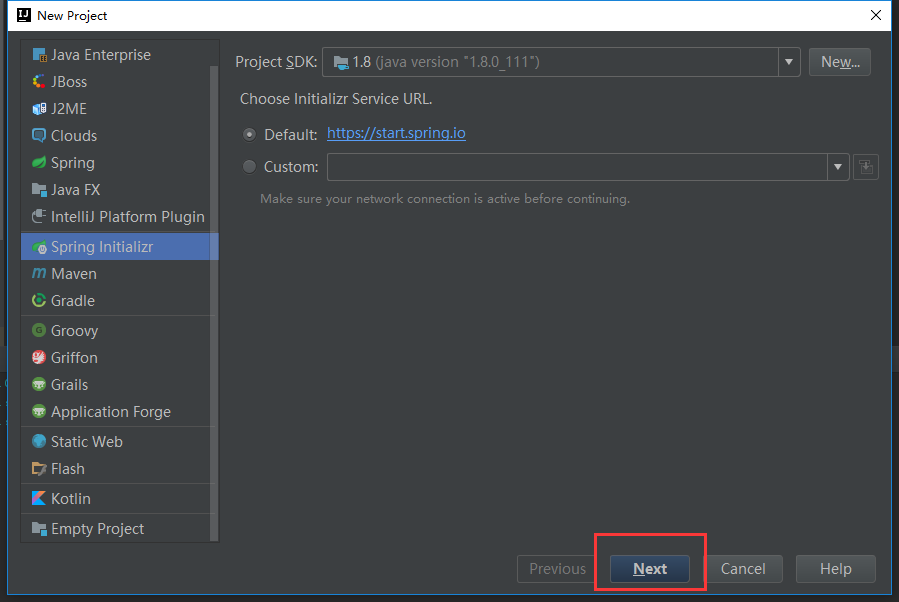
a、使用 IDEA构建
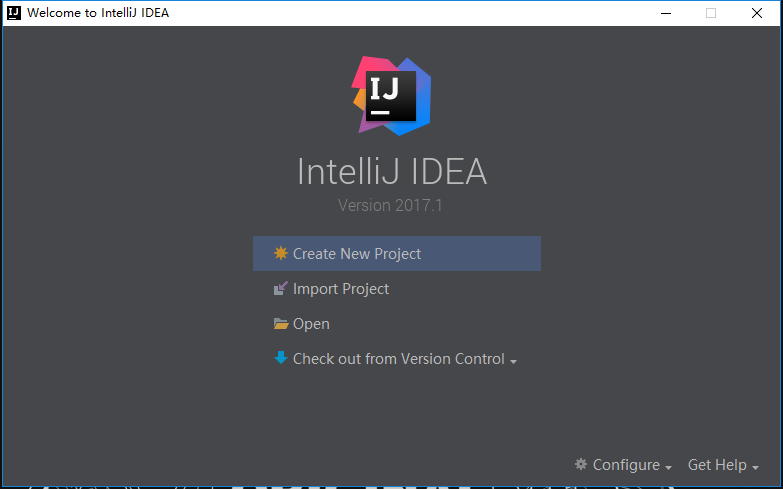
b、 New 来创建一个新的应用程序
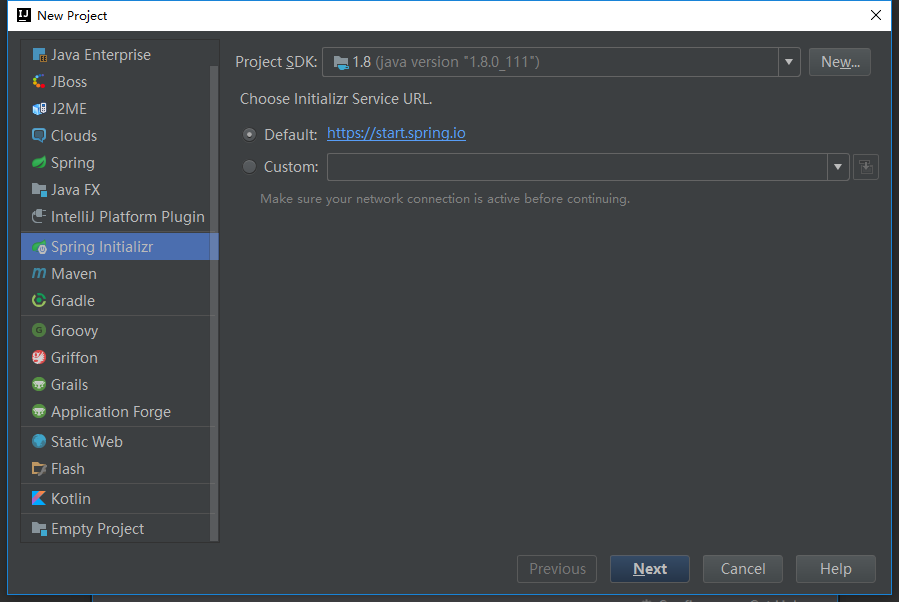
c、Next继续下一步操作
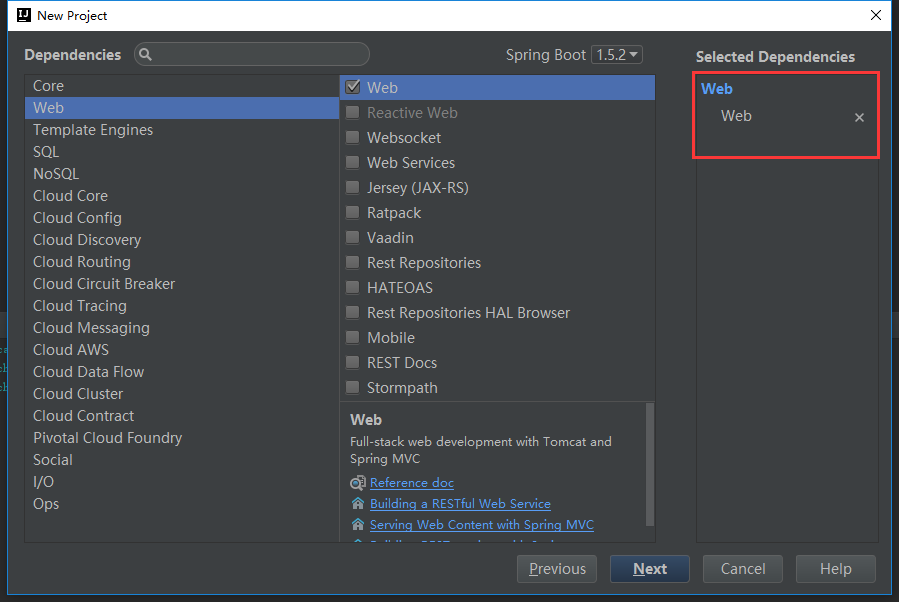
d、勾选Web依赖
注意:
如果选择了war形式,也添加了Web依赖并且使用形式启动,则需要注释pom.xml配置文件内依赖的scope属性
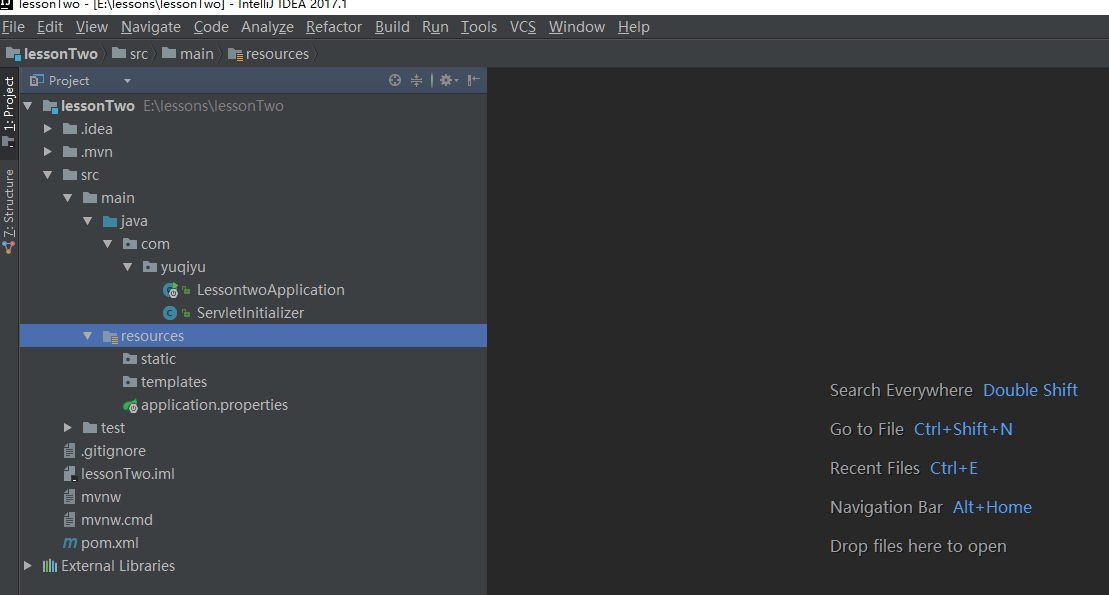
e、目录结构
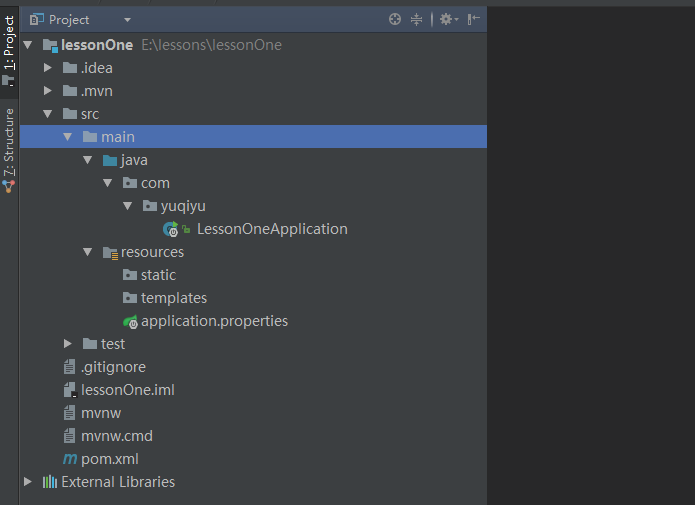
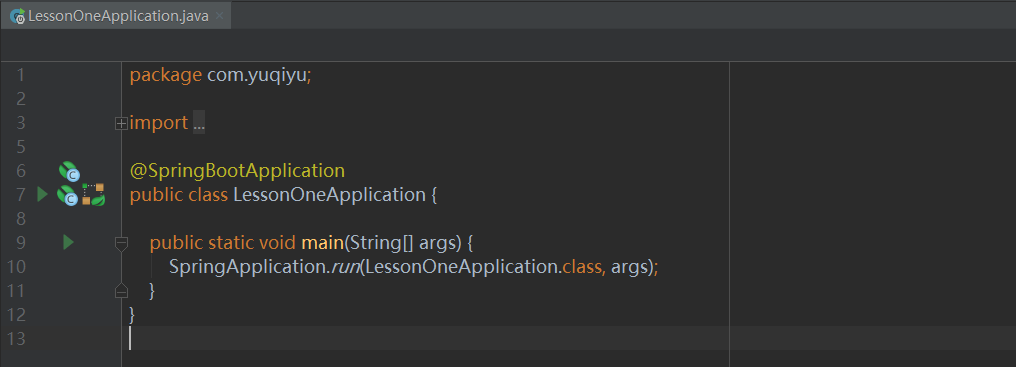
:该类是程序的入口类内有个main方法,可以直接通过run as运行项目
.:该配置文件是项目的核心配置文件
pom.xml:maven配置文件
它是声明当前类为的入口类。而一个项目内有且只能有一个这个注解存在。
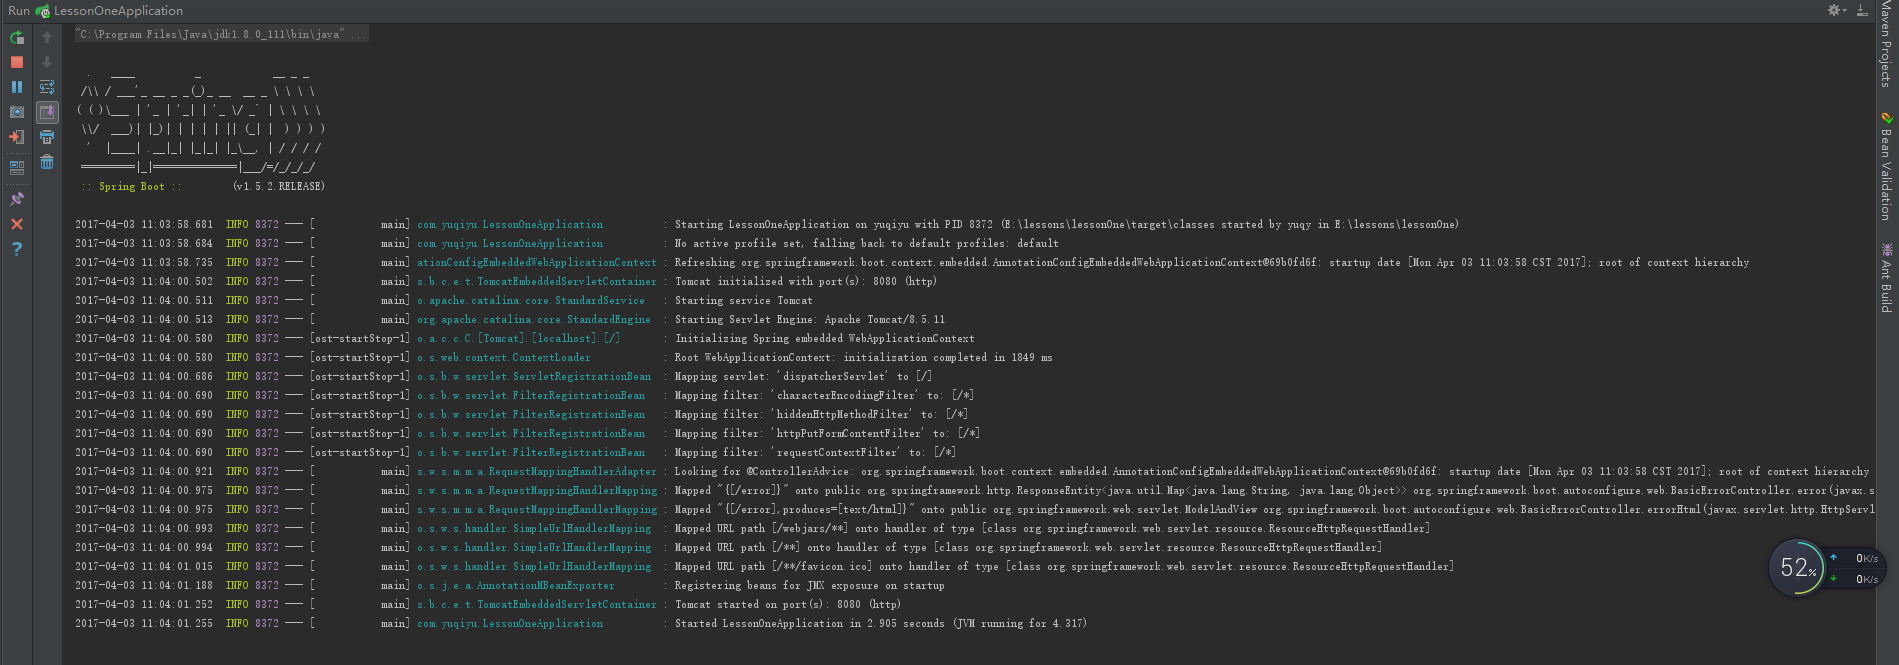
f、运行项目
入口程序类中右键->Run ,通过内置的容器启动的,并且端口号默认是8080
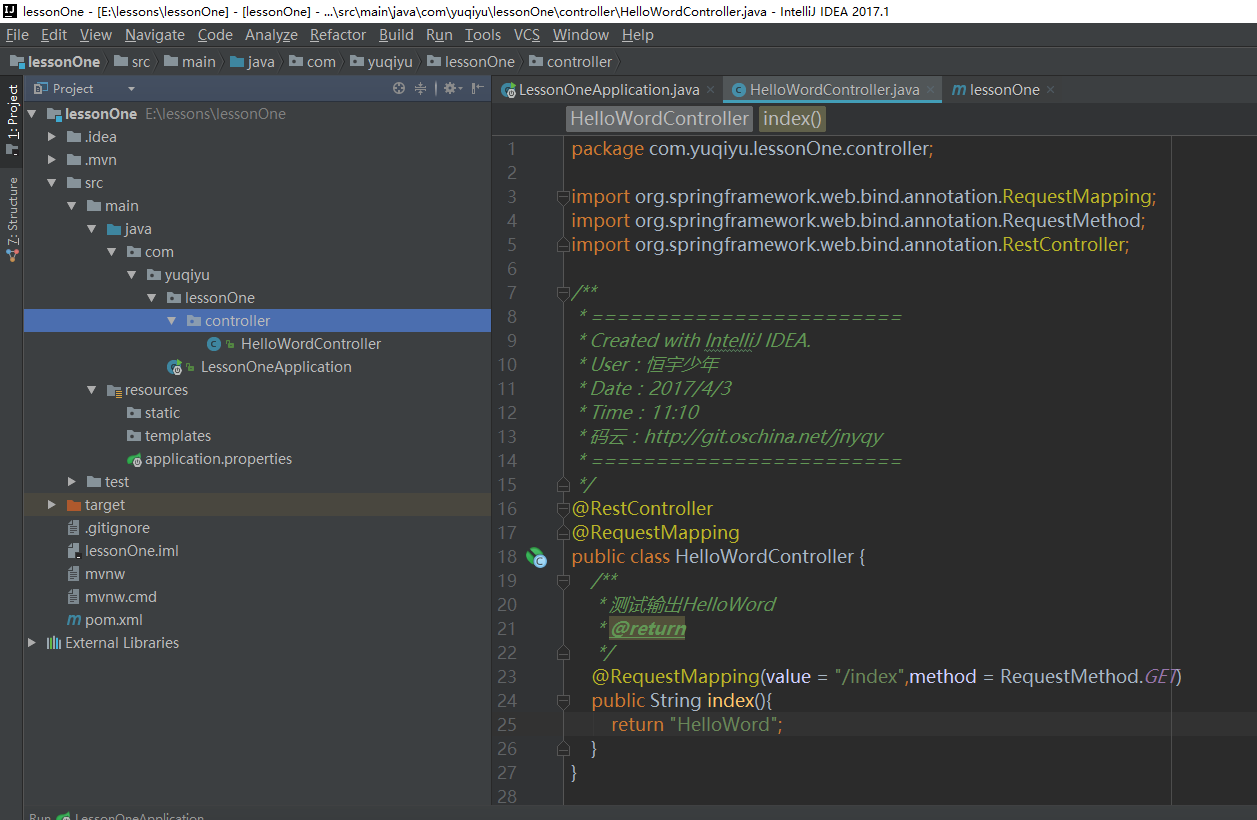
g、编写
我们使用@来声明我们新创建的是一个访问控制器
jsp启动
a、首先我们需要创建一个项目
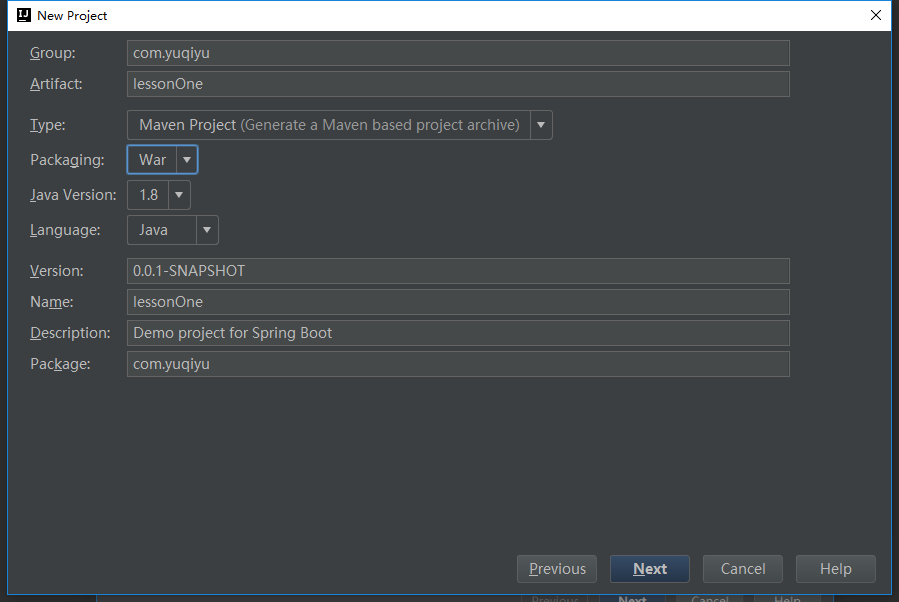
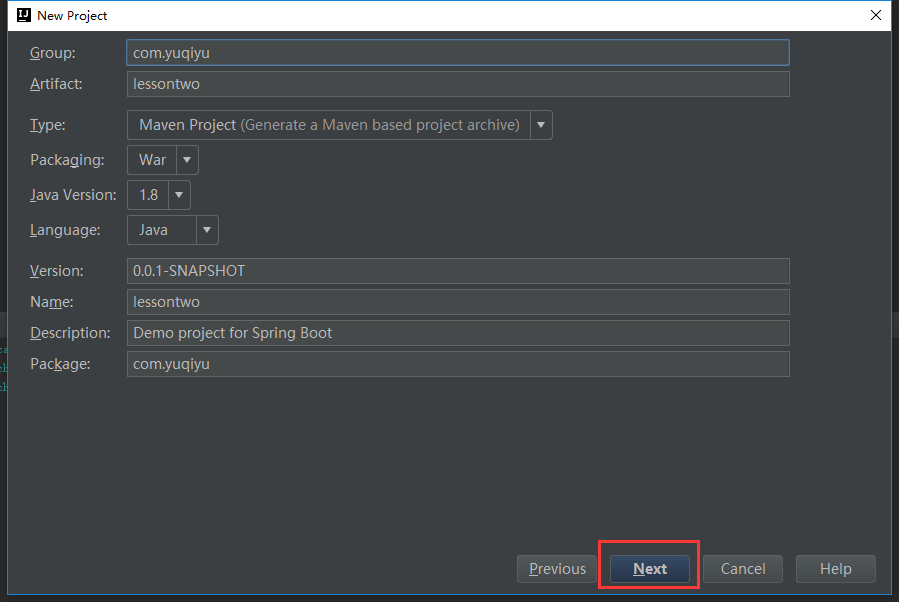
b、点击Next后输入一些项目的基本参数(包名,工程名,打包形式,maven形式构建等)
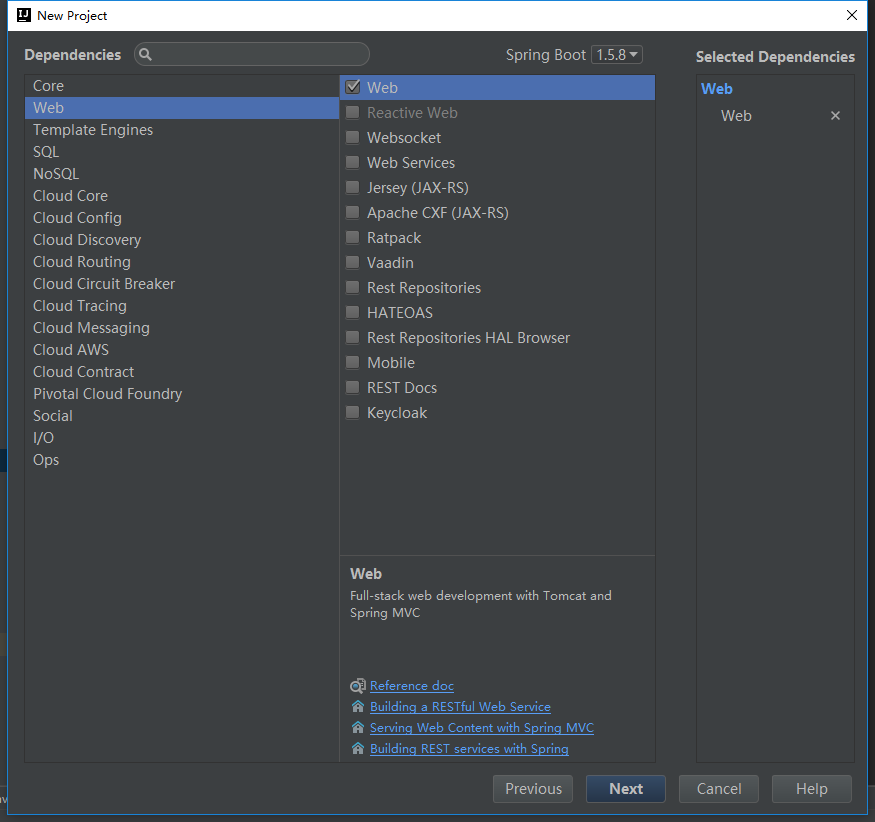
c、点击Next后选择我们预先加入到工程的内置的jar包组件,我们这里选择一个web组件
d、Next输入项目名称后店家既可以完成了项目的构建
e、配置pom.xml
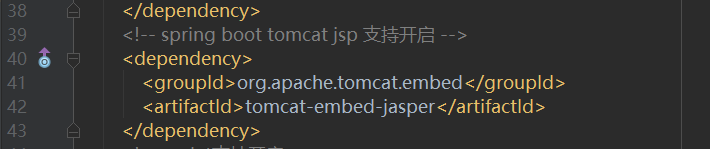
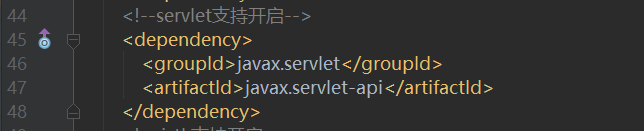
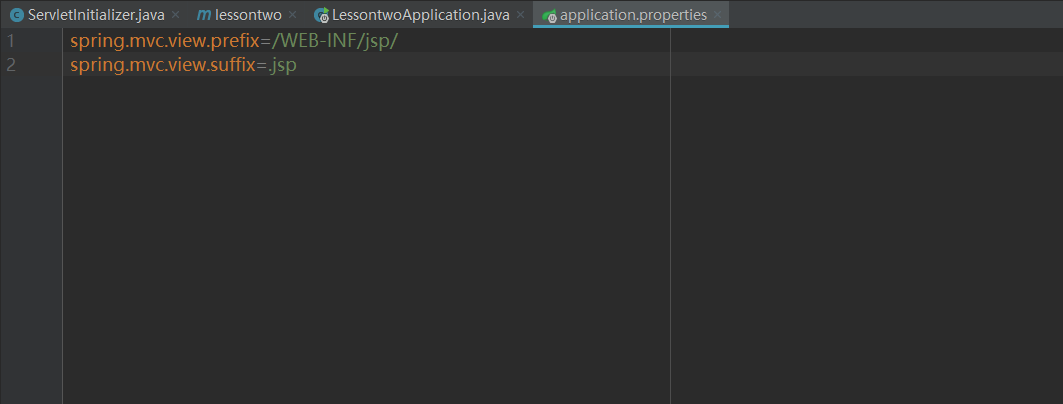
f、配置.和jsp
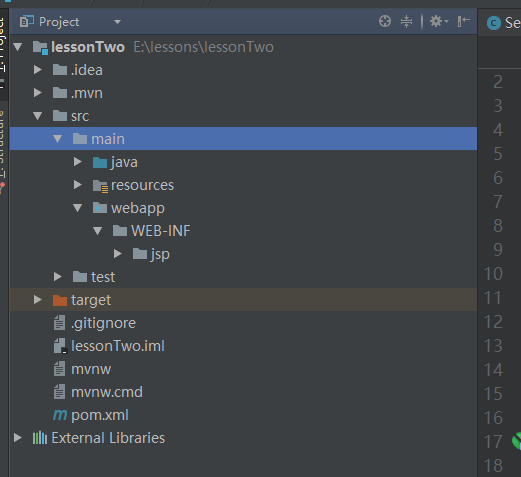
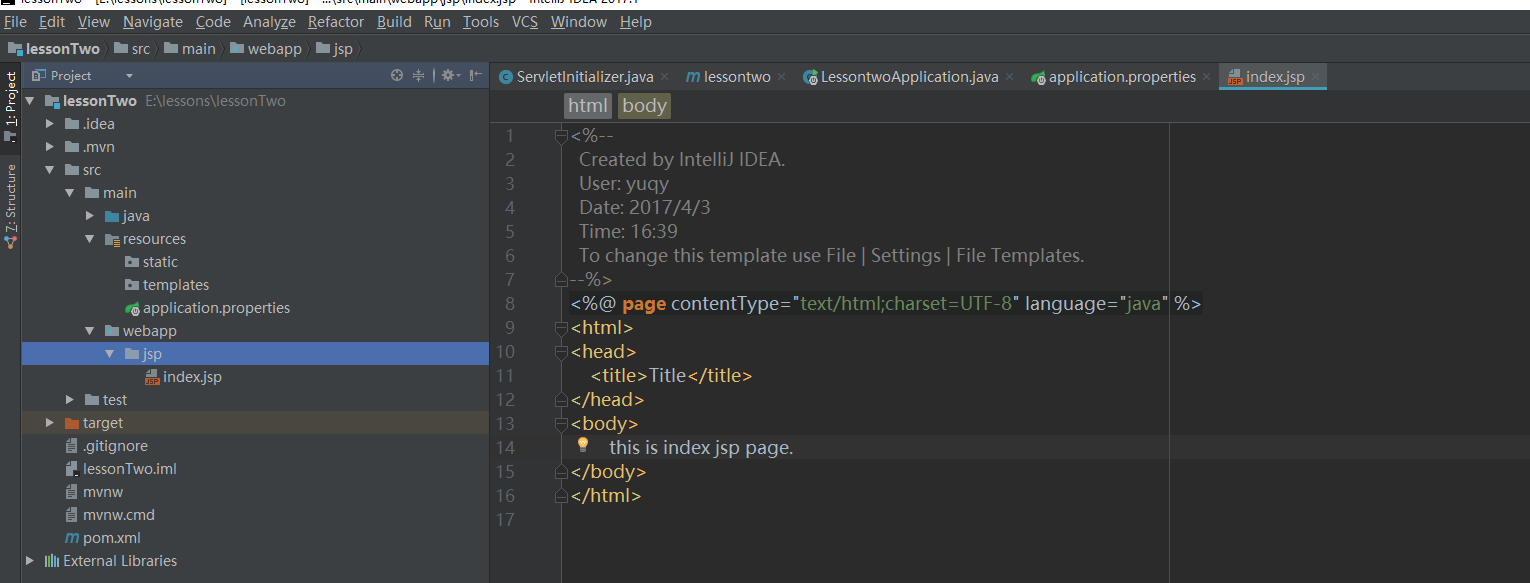
g、/jsp目录下创建一个index.jsp用于测试我们的配置是否已经支持了jsp
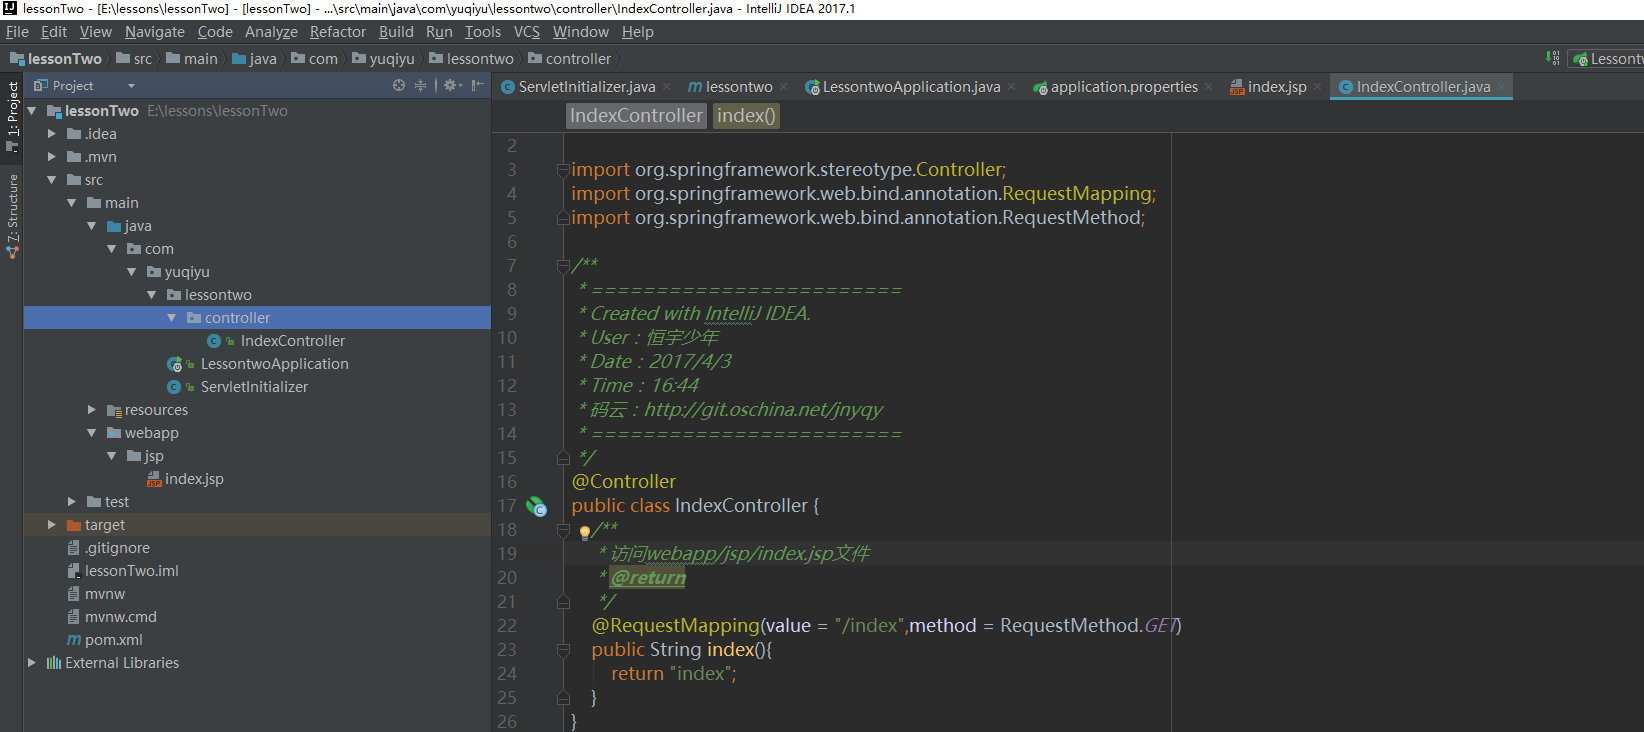
h、配置的控制器,我们新建
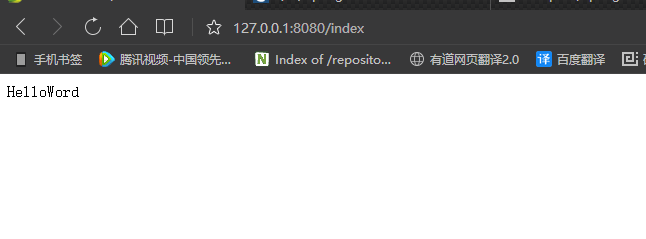
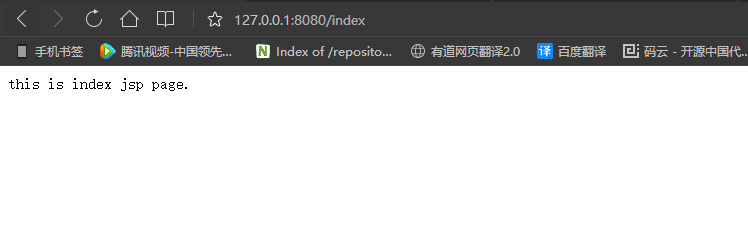
i、启动项目我们尝试访问127.0.0.1:8080/index
3、 和常见 xml
@Configuration
public class MockConfiguration{// bean定义
}
其他
@ 对应 XML 配置形式中的
@对应 整合配置文件,如bean相关配置等等
@ 用于指定 文件,将属性加载到 IoC
4、@n
通过@n注解标注的main()方法启动,源码中重要的只有三个
@ 自动导入+@kage自动配置
组件扫描器:扫描组件
组件配置类:被组件扫描
5、-boot-
a、-boot- 自动配置依赖模块
b、都约定以 -boot-- 作为命名的前缀
c、,点击“ to the full ”链接,有 .3.2 默认支持和提供了大约 80 多个自动配置依赖模块。
两个核心
-boot--和-boot--web
统一各种jar的版本号,引入其他的依赖就可以省略版本号,可以忽略使用默认的版本号
org.springframework.boot spring-boot-starter-parent 2.0.0.RELEASE
自动嵌入容器。从.中读取web应用的配置,如:.port,不写使用默认配置
org.springframework.boot spring-boot-starter-web
第二章:核心配置与注解 1、全局配置文件
a、.或.yaml作为全局配置文件
b、yaml 中的数据是有序的, 中的数据是无序的
.配置文件
可以是环境变量、参数等信息
#端口
server.port=8082
#上下文
server.servlet.context-path=/nyfz
# 文件编码
banner.charset= UTF-8
# 文件位置
banner.location= classpath:banner.txt
@将对象作为Bean组件放到ring器中
@设置路径
@ies( = “book”)将book开头的属性设值注入
book.name=三国演义
book.author=罗贯中
book.id=1
@Component
@PropertySource("classpath:book.properties")
@ConfigurationProperties(prefix = "book")
public class Book {private Long id;private String name;private String author;//省略getter/setter
}.yaml
字面量直接写在后面就可以 , 不需要使用引号
k: v#对象、Map格式
k: v1:v2:缩进写法
student:name: qinjiangage: 3
行内写法
student: {name: qinjiang,age: 3}缩进写法
pets:- cat- dog- pig
行内写法pets: [cat,dog,pig]
person:name: 纳鲁多age: 22happy: truebirth: 2019/09/14maps: {k1: v1,k2: v2}lists:- 哈哈哈- 呵呵呵- 嘻嘻嘻dog:name: 旺财age: 3@Component // 注册bean到容器中
@PropertySource("classpath:person.properties")
@ConfigurationProperties(prefix = "person")
public class Person {private String name;private Integer age;private boolean happy;private Date birth;private Map maps;private List @SpringBootTest
class Springboot002ApplicationTests {@Autowiredprivate Person person;@Testvoid contextLoads() {System.out.println(person);}
}注意:
导入配置文件处理器,配置文件进行绑定就会有提示
d06501e814cfe1a92f6d257182a4b899
[ -> 中配置;
2、 Boot 使用
使用@注解可以实现不同环境下配置参数的切换
@Configuration
@Profile("production")
public class ProductionConfiguration {// ...
}
@Configuration
@Profile("test")
public class TestConfiguration {// ...
}
在存在多个情况下,你可以使用..来设置哪些被激活
spring.profiles.active=dev,hsqldb
spring.profiles.active:dev,hsqldb
3、随机数的使用
#随机32位MD5字符串
user.random.secret=${random.value}#随机int数字
user.random.intNumber=${random.int}#随机long数字
user.random.longNumber=${random.long}#随便uuid
user.random.uuid=${random.uuid}#随机10以内的数字
user.random.lessTen=${random.int(10)}#随机1024~65536之内的数字
user.random.range=${random.int[1024,65536]}
第三章: boot整合
Dao:
@Mapper
public interface LibrarianMapper {Librarian selectLibrarian(int id);
}
.xml:
test:
@SpringBootApplication(scanBasePackages={"com.example.*"})
@MapperScan("com.example.dao")
public class SpringBootDemoApplication {public static void main(String[] args) {SpringApplication.run(SpringBootDemoApplication.class, args);}
}
扫包的设置
spring.thymeleaf.cache=false
spring.devtools.restart.enabled=true
spring.devtools.restart.additional-paths=src/main/java  spring.datasource.driver-class-name=com.mysql.jdbc.Driver
spring.datasource.url=jdbc:mysql://localhost:3306/db_library
spring.datasource.username=root
spring.datasource.password=4008mybatis.type-aliases-package=com.example.entity
mybatis.mapperLocations=classpath:mappers/*.xml
83c7cac440a8f3af5aef9905bf458567
第四章:实现web的常用功能 1、的整合
默认配置好了web,例如不需要配置视图解析器
核实无参get方式的请求跳转,比较简单
@Configuration
public class WebConfig implements WebMvcConfigurer {@Beanpublic ConnectInterceptor connectInterceptor() {return new ConnectInterceptor();}@Overridepublic void addInterceptors(InterceptorRegistry registry) {registry.addInterceptor(userInterceptor()).addPathPatterns("/**").excludePathPatterns("/admin/**").order(1);registry.addInterceptor(connectInterceptor()).addPathPatterns("/provinceExtend/**").order(2);registry.addInterceptor(connectInterceptor()).addPathPatterns("/gatewayExtend/**").order(3);}
}
方法对应的是xml文件中配置
a、添加注释@
b、继承接口
c、()判断用户是否登录
2、文件上传和下载
第五章:AOP与 1、配置aop
@RestController
@RequestMapping("/aopController")
public class AopController {@RequestMapping(value = "/Curry")public void Curry(){System.out.println("库里上场打球了!!");}@RequestMapping(value = "/Harden")public void Harden(){System.out.println("哈登上场打球了!!");}@RequestMapping(value = "/Antetokounmpo")public void Antetokounmpo(){System.out.println("字母哥上场打球了!!");}@RequestMapping(value = "/Jokic")public void Jokic(){System.out.println("约基奇上场打球了!!");}@RequestMapping(value = "/Durant/{point}")public void Durant(@PathVariable("point")  int point){System.out.println("杜兰特上场打球了!!");}
}
通知类
@Aspect
@Component
public class BrokerAspect {/*** 定义切入点,切入点为com.example.demo.aop.AopController中的所有函数*通过@Pointcut注解声明频繁使用的切点表达式*/@Pointcut("execution(public * com.example.demo.aop.AopController.*(..)))")public void BrokerAspect(){}/*** @description  在连接点执行之前执行的通知*/@Before("BrokerAspect()")public void doBeforeGame(){System.out.println("经纪人正在处理球星赛前事务!");}/*** @description  在连接点执行之后执行的通知(返回通知和异常通知的异常)*/@After("BrokerAspect()")public void doAfterGame(){System.out.println("经纪人为球星表现疯狂鼓掌!");}/*** @description  在连接点执行之后执行的通知(返回通知)*/@AfterReturning("BrokerAspect()")public void doAfterReturningGame(){System.out.println("返回通知:经纪人为球星表现疯狂鼓掌!");}/*** @description  在连接点执行之后执行的通知(异常通知)*/@AfterThrowing("BrokerAspect()")public void doAfterThrowingGame(){System.out.println("异常通知:球迷要求退票!");}
}
2、事务
@只能被应用到方法上, 对于其它非的方法,如果标记了@也不会报错,但方法没有事务功能.
第六章:整合Redis
value:缓存名 key:缓存的key
@Cacheable(value = "RedisInfo", key = "#root.methodName+'['+#account+']'")更新数据库和缓存
@CachePut(value="user",key = "#result.id")删除数据库和缓存
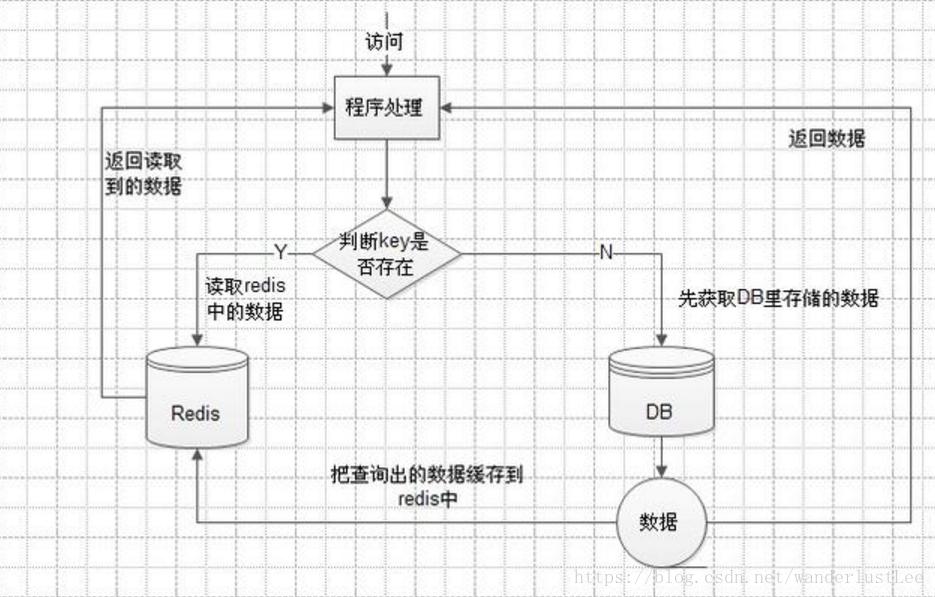
@CacheEvict(value = "user",key = "#id")1、理解
a、通过缓存来减少对关系型数据库的查询次数
b、在执行DAO类的***(), query***()方法时,先从Redis中查询有没有缓存数据,如果没有再查询数据库
2、使用
开启缓存注解支持
统一设置缓存空间,这样该类所有的方法都可以省略相应的属性
@Service
@CacheConfig(cacheNames="userCache") // 本类内方法指定使用缓存时,默认的名称就是userCache
public class UserDAOImpl implements UserDAO{//分享@CachePut(key = "#P1")public void share(String username,String title,String content){
}//@Cacheable() // @Cacheable 会先查询缓存,如果缓存中存在,则不执行方法public User selectUser(String username){User user = null;System.out.println(username);UserMapper userMapper=sqlSession.getMapper(UserMapper.class);user = userMapper.selectUser(username);sqlSession.commit();return user;}@Cacheable(key = "getMethodName()") // @Cacheable 会先查询缓存,如果缓存中存在,则不执行方法public List seeShare() {List list = new LinkedList();DiaryMapper diaryMapper = sqlSession.getMapper(DiaryMapper.class);list = diaryMapper.selectShare();sqlSession.commit();return list;}
}
第七章:消息服务
a、消息中间件关注于数据的发送和接收,利用异步消息传递机制集成分布式系统。
b、当发送消息以后,将由消息代理接管,消息代理保证消息传递到指定目的地。
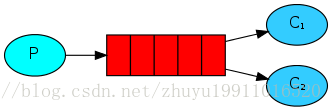
消息代理消息放入一个队列中。个消息最终只能被一个接收者所接受。
发布者发送消息到主题,多个接收者(订阅者)监听(订阅)这个主题
1、
a、生产者()创建消息
b、然后发布到队列(queue)中
c、消费者()订阅某个队列
d、最后将消息发送到监听的消费者,可以有多个消费者,消息会被平均分摊给多个消费者进行处理
2、 Boot与整合实现
1).添加引用依赖
org.springframework.boot spring-boot-starter-amqp
2).添加配置
spring.rabbitmq.host=192.168.68.128
spring.rabbitmq.port=5672
spring.rabbitmq.username=admin
spring.rabbitmq.password=admin
spring.rabbitmq.virtual-host=zy_host
3).队列配置
@Configuration
public class RabbitConfig {//定义一个名称为hello的队列@Beanpublic Queue HelloQueue(){return new Queue("hello");}
}
4).生产者
默认实现
@Component
public class HelloSender {@Autowiredprivate AmqpTemplate rabbitTemplate;public void send(String queueName, String message){rabbitTemplate.convertAndSend(queueName,message);}
}
5).消费者,监听队列,处理消息
@Component
@RabbitListener(queues = "hello")
public class HelloReceiver {@RabbitHandlerpublic void process(String context){System.out.println("Receiver : " + context);}
}
6).测试,生产者与消费者的queue name必须一致
@RunWith(SpringRunner.class)
@SpringBootTest
public class RabbitMQTest {@Autowiredprivate HelloSender helloSender;@Testpublic void sendMessage(){helloSender.send("hello","你好,我要向队列发送消息1...");}
}
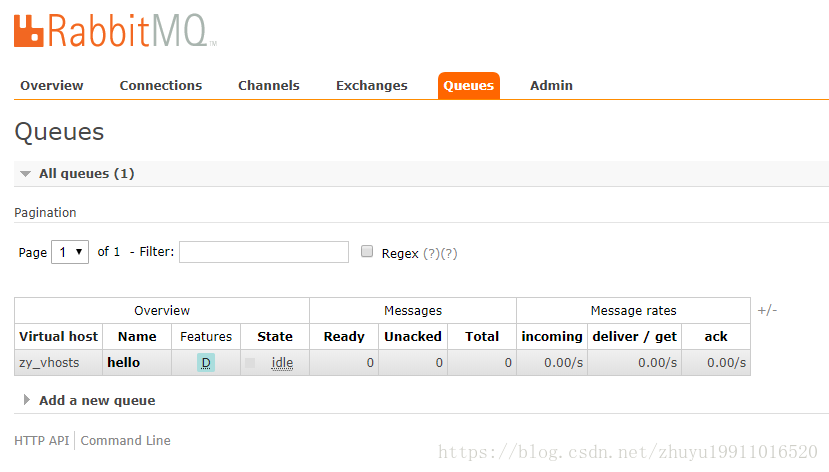
多个生成者
@Test
public void sendManyMessage(){for (int i=0;i<5;i++){helloSender.send("hello","你好,我要向队列发送消息1..."+i);helloSender.send("hello","你好,我要向队列发送消息2..."+i);}
}
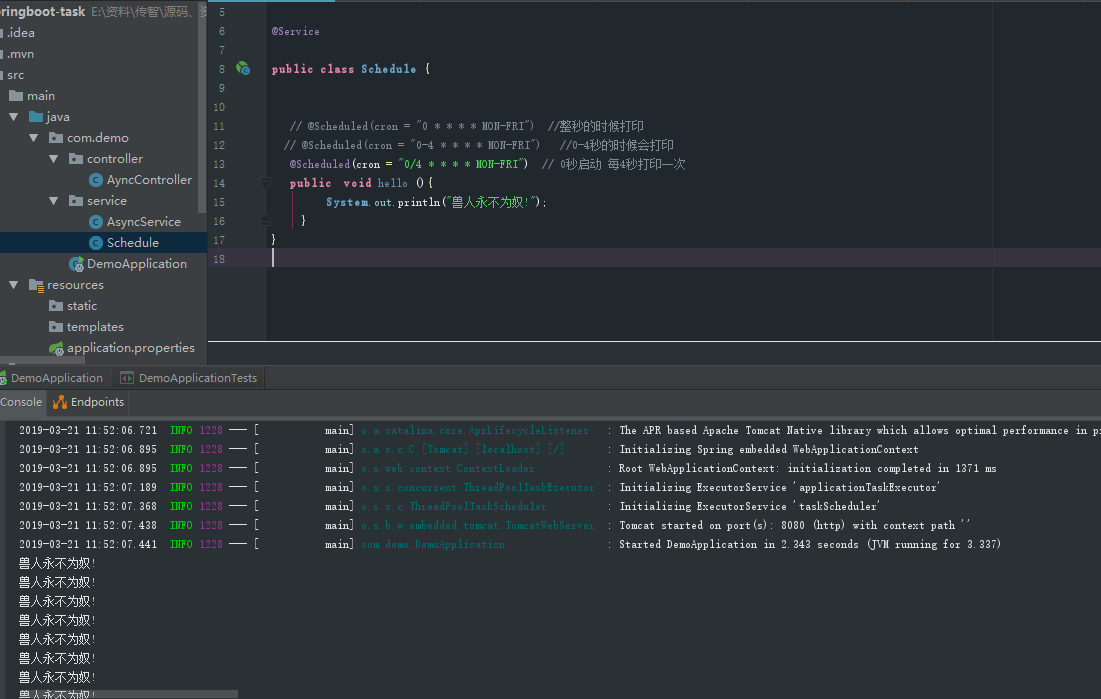
第八章:任务管理 1、异步任务
@Async标记异步方法
@Service
public class AsyncService {@Asyncpublic  void hello(){try {Thread.sleep(6000);} catch (InterruptedException e) {e.printStackTrace();}System.out.println("处理数据中...");}
}
@=+
@RestController
public class AyncController {@AutowiredAsyncService asyncService;@GetMapping("/hello")public  String hello(){asyncService.hello();return "success";}
}
即可开启异步任务
@EnableAsync  //开启异步任务
@EnableScheduling  //开启定时任务
@SpringBootApplication
public class DemoApplication {public static void main(String[] args) {SpringApplication.run(DemoApplication.class, args);}}
二、定时任务
//表达式范例
每隔1分钟执行一次:0 */1 * * * ?
每天23点执行一次:0 0 23 * * ?
每天凌晨1点执行一次:0 0 1 * * ?
每月1号凌晨1点执行一次:0 0 1 1 * ?
每月最后一天23点执行一次:0 0 23 L * ?
每周星期天凌晨1点实行一次:0 0 1 ? * L
在26分、29分、33分执行一次:0 26,29,33 * * * ?
每天的0点、13点、18点、21点都执行一次:0 0 0,13,18,21 * * ?
@表达式
@Servicepublic class Schedule {// @Scheduled(cron = "0 * * * * MON-FRI")  //整秒的时候打印// @Scheduled(cron = "0-4 * * * * MON-FRI")   //0-4秒的时候会打印@Scheduled(cron = "0/4 * * * * MON-FRI")  // 0秒启动 每4秒打印一次public  void hello (){System.out.println("兽人永不为奴!");}
}
@ //开启定时任务